The Floor Planner Wall Thickness Feature and Finetuning Tool
These instructions show how the Wall Thickness feature can be used for creating more detailed floor plans, and present the Finetuning Tool, which was introduced alongside Wall Thickness but can also be used independently.
Overview
Note that these new functionalities are supported only on in4mo Task Reporter 15.1 or newer. If you open a drawing in which wall thickness has been used with an older version of the FloorPlanner tool, you will see a notification informing you of this and you will not be able to make or edit drawings. The new functionalities offer more accurate measurements, which will not be shown in the unsupported versions. For the best experience, you should make sure you are using the latest version of in4mo Task Reporter.
Wall Thickness Feature
The Wall Thickness feature allows you to specify the thickness of walls in your floor plans. Accurate wall thickness is crucial for realistic representations. With this feature, you can create floor plans that reflect the actual dimensions of walls, ensuring precision and clarity.
Enabling Wall Thickness in the Floor Planner
The Wall Thickness functionality in the Floor Planner is enabled by default when logging in for the first time to the 15.1 version. To manage this feature, follow these steps:
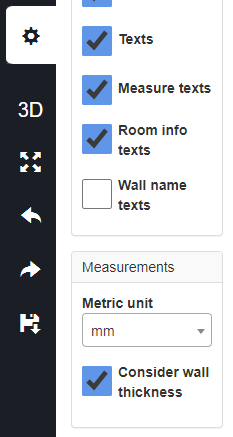
- Access Settings: Navigate to the Measurements section in the Floor Planner settings.
- Toggle Wall Thickness: Tick the Consider Wall Thickness check box. This setting allows you to enable or disable the Wall Thickness functionality.
Before making any changes, the system presents a warning popup with the following message: “This will affect and change the measurements of the already drawn rooms. Are you sure you want to continue?” You have two options:
- Yes: Change the settings.
- Cancel: Revert to the previous setting.

Understanding Wall Thickness Measurements
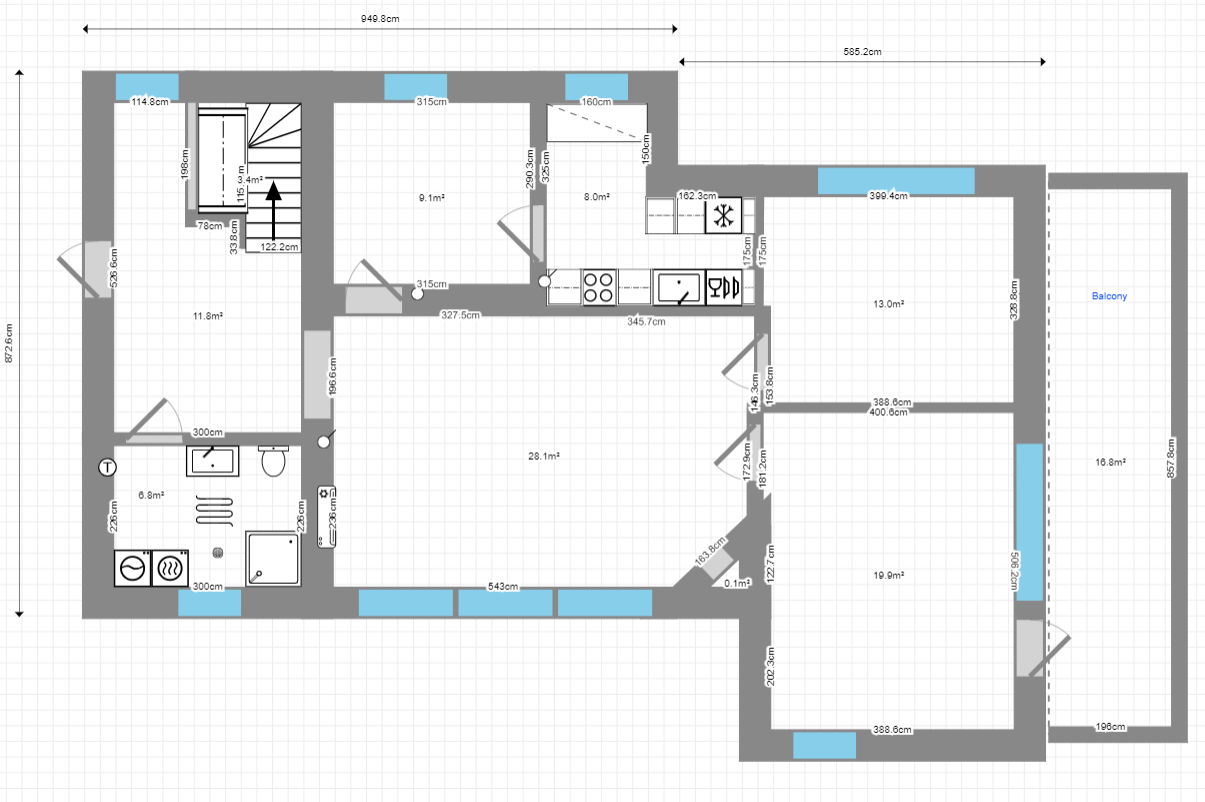
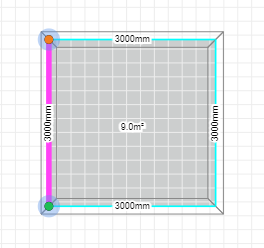
In previous versions of the Floor Planner the wall thickness was not considered, which meant that each wall was just a line enclosing an area. However, in version 15.1, when considering wall thickness, the room area is measured within the inner edges of the walls. The defined thickness is projected from the centerline of a wall in both directions, with the wall length being the inner edge.
Previous versions of Floor Planner and when wall thickness is ignored:
Each wall is treated as a single line enclosing an area.- The length of the centerline of walls with thickness is considered as the single-line wall length.
- Consequently, the enclosed area will differ from the “Considering Wall Thickness” view.
Floor planner 15.1, when considering wall thickness:
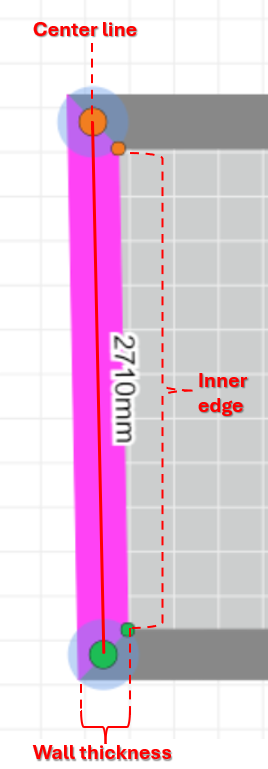
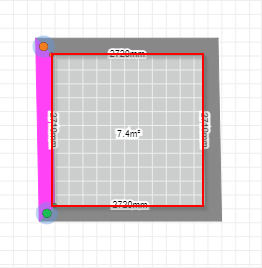
The area is measured based on the inner edges of the walls, accounting for the defined thickness projected from the centerline of each wall.- The resulting floor plan reflects the actual dimensions, including wall thickness.
Important: When you switch from considering to ignoring wall thickness (or vice versa), the behavior affects both the length of the centerline of walls with thickness and the enclosed area. Choosing between these modes impacts how your floor plan measurements are interpreted.
Measurement data used by iCC is always saved according to the last view’s measurements in which the Floor Plan was saved (either Consider Wall Thickness or Ignore Wall Thickness view).
Viewing Floor Plans with Wall Thickness Functionality in Older App Versions
The Wall Thickness functionality is available starting from version 15.1 of the in4mo Task Reporter mobile application.
If you are operating an older version of Floor Planner you can open Floor plans made with new version only in Read-only mode. If Wall Thickness functionality has been used, floorplans will appear in an incomplete format — like how it looks when wall thickness is disabled in version 15.1. Additionally, you’ll receive a warning message from the Floor Planner, notifying you about using an outdated version.
Drawing a Room or Walls with Wall Thickness
When the Consider Wall Thickness feature is turned on, you can create entire rooms with specified wall thickness.
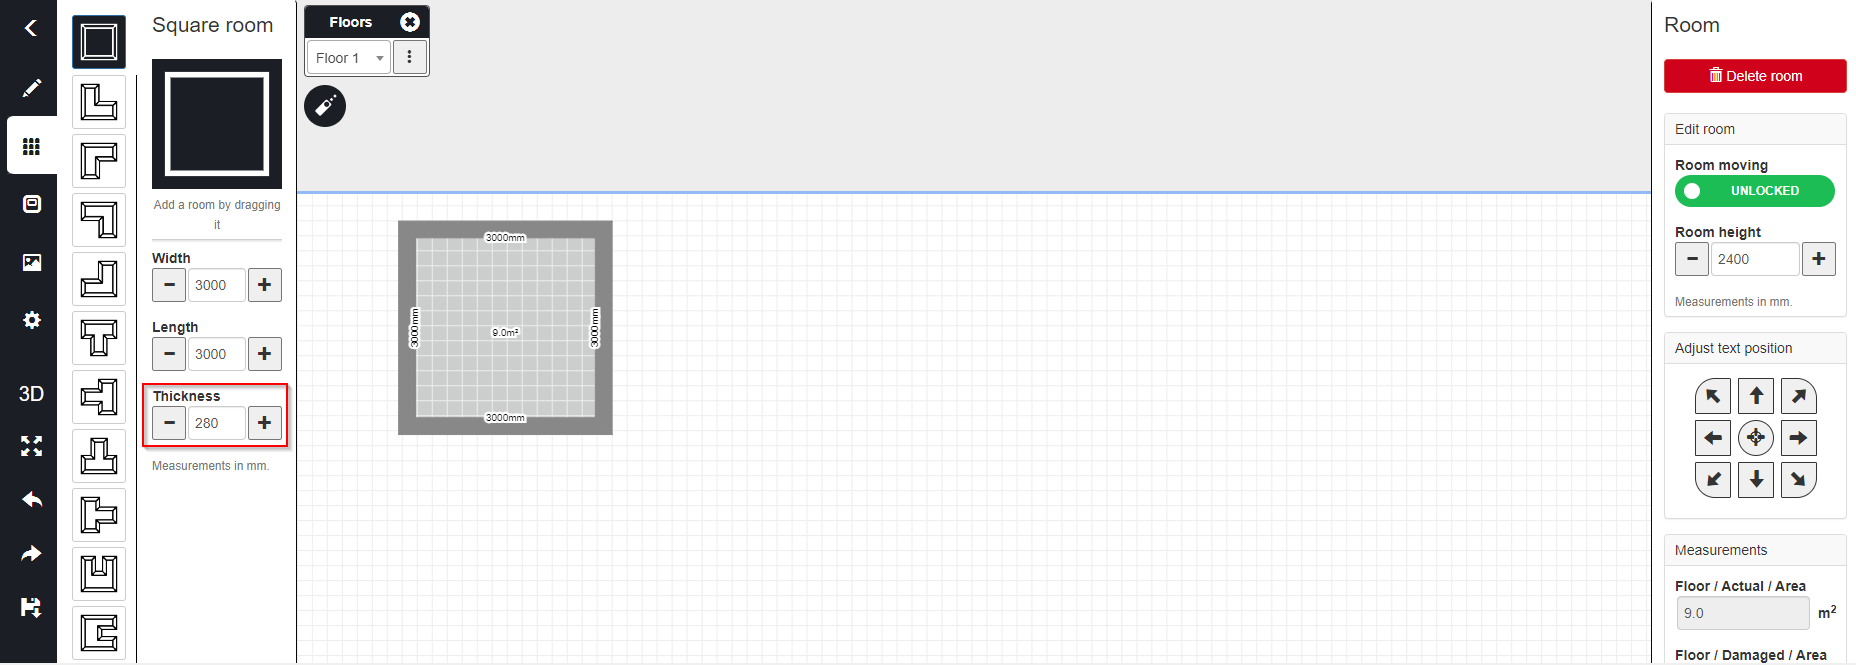 Set the length and width of the room measured from inside of the room and specify the thickness of the wall.
- Drag and drop the room onto the floor planner sheet.
Floor planner will remember the wall thickness used previously and offers that as a default.
Wall thickness is also available when drawing individual walls with the wall tool.
If the enclosed room area or measurements do not precisely match your desired dimensions, you can easily adjust the measurements by:
- Dragging walls: Move and fine tune walls and corners to adjust the layout.
- Adjusting walls individually: Modify wall length, thickness, and offset on a single wall as needed. More information about fine tuning and wall offset can be found toward the end of these instructions.
Handling Wall Thickness in Complex Floor Plans
When creating intricate floor plans with multiple rooms, consider the following scenarios related to wall thickness:
Joining Rooms

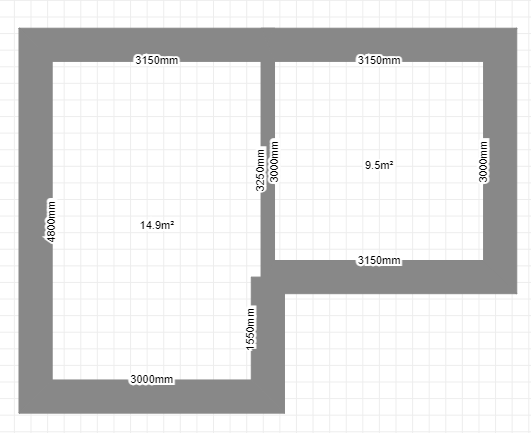
In the Consider Wall Thickness view, when rooms share a wall, the joining wall adopts the thickness of the first room.
Specifically:
If you add a second room with thicker walls, only the section of the joining wall that connects to the first room will adopt the thinner wall thickness.
The rest of the walls in both rooms will preserve their original thickness.
Partial joining
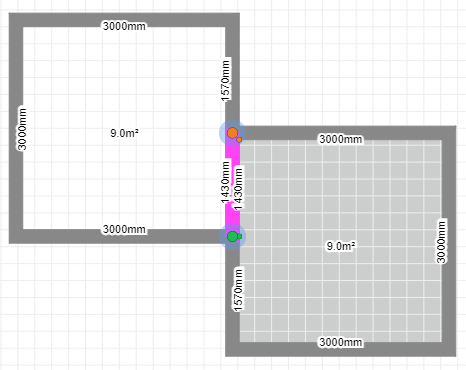
If you add a room that partially joins two existing rooms, the Floor Planner will automatically split the walls at the points of joining.
This split enables you to customize sections more easily.
Editing a Wall

When a wall is selected, you can adjust the wall by dragging the wall from the center or from its corners.
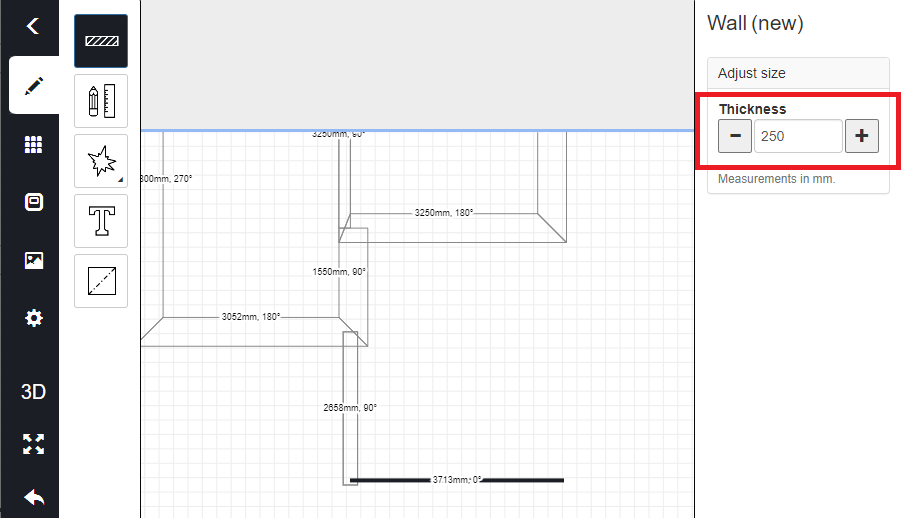
Wall parameters length, thickness, and offset can be changed from the right side of the view.
In the case of a shared wall, measures are shown on both sides of the wall. The measures can be hidden from one or from both sides of the shared wall.
Wall Offset
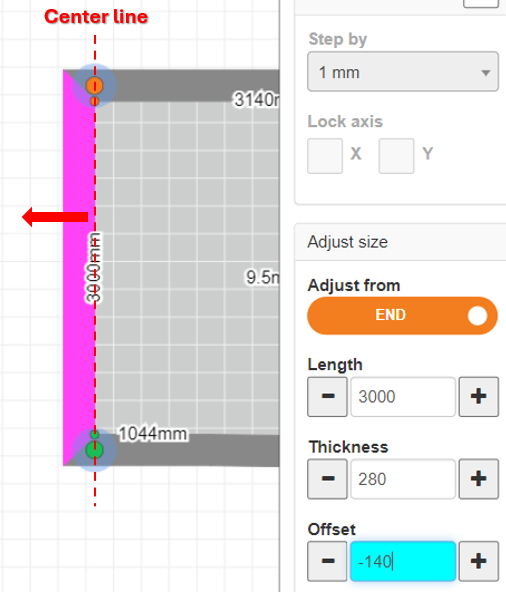

With the new wall offset parameter it is possible to move the wall inwards or outwards of the room in respect to its centerline.
Offset becomes especially handy when two or more walls have varying wall thicknesses, and you want to make the inner wall even.
Finetuning Tool

The Finetuning Tool complements the Wall Thickness feature. It provides additional control over the walls and corners of your floor plan.
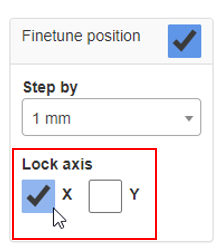
You can use the Finetuning tool in both Consider/Ignore wall thickness modes, by ticking the Finetune position checkbox on the right-hand side menu bar when a wall is selected.
The functionality then enables you to drag the walls and wall corners with the precision of your chosen unit. 1 mm steps are selected by default, but this can be adjusted to 1 cm (10mm), or 10 cm (100mm) rates by selecting these options from the Step by dropdown list.
By default, the feature allows you to drag freely both vertically and horizontally. However, you can further limit this by locking the axis directions:
- Ticking the ‘X’ checkbox locks the horizontal dragging, and the walls can only be moved up or down.
- Ticking the ‘Y’ checkbox locks the vertical dragging, and the walls can only be moved sideways.
- Note, you can only lock one axis direction at a time.