


How to Estimate Costs in iCC
The in4mo Cost Calculation solution will help you to estimate the cost for a damage or a renovation project. Here you get the foundation for make them fast and easy.
Overview
This serves as a guide for how iCC is used in cases. Here we show both how an iCC work plan is made from the Task Reporter app on a tablet, and from a web portal, as well as how you use work plan templates, send budgets for approval, approve budgets, as well as how you can create a PDF showing different parameters from calculations.
Creating a Work Plan from a Tablet
It is possible to create a work plan from the Task Reporter app on a tablet. Note that the work plan functionality is only available on tablets, not on phones. Creating a work plan from the app is possible in inspection tasks and project management. This is done the same way for both task types.
To access the work plan, open an inspection or project management task, then press Fill work plan.
When you open the work plan, there may be a small window popping up saying that it’s downloading work plan items. This is done to synchronize the work plan with what’s on the server, meaning that if work items have been added from the web portal or from another tablet, then this will be synchronized so that these items appear in the work plan on your tablet. You can also trigger this synchronization manually at any time from the work plan by pressing the ![]() icon on the top bar.
icon on the top bar.


There are two structures which the work plan can follow; Room based or Task based. By default, the system will show the work plan following a room-based structure, however it is possible to change this at any point inside a work plan by pressing the switch on the top right side. It is also possible to change the default structure in the app settings. Whatever structure you use does not affect what work items are available, they merely affect how you get to the work items.

The structure you choose determines how the list on the left side is structured. If following a room-based structure, the list on the left will show the name of different rooms, e.g. kitchen. When you press a room, you will next have to choose a structure, e.g. wall or floor. Choose one of the options, and you will see a list of the different tasks that exist in in4mo, e.g. demolition and carpentry work. Choose a task, and you will see all work items for this task and structure.
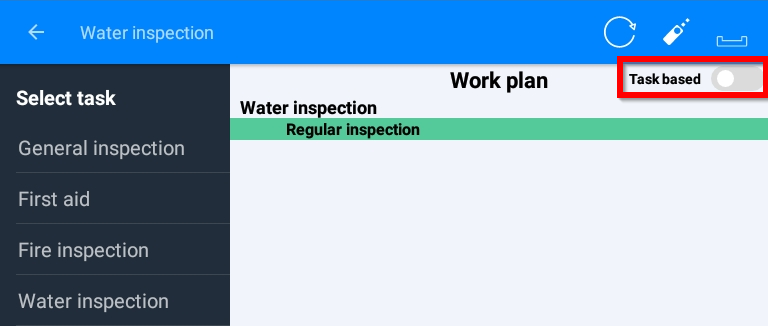
If following a task-based structure, you will first choose a task, e.g. demolition or carpentry work. When you have selected a task, you will next have to select a room, followed by structure, and then you will see the work items for this task and structure.

It is possible to search for work items by pressing the magnifying glass. The search function is accessible after you have selected which room there should be searched under.
Once you have entered some text in the search field, you will get results based on the search. You can then choose to add some or all of the work items that appear in the result from the search.
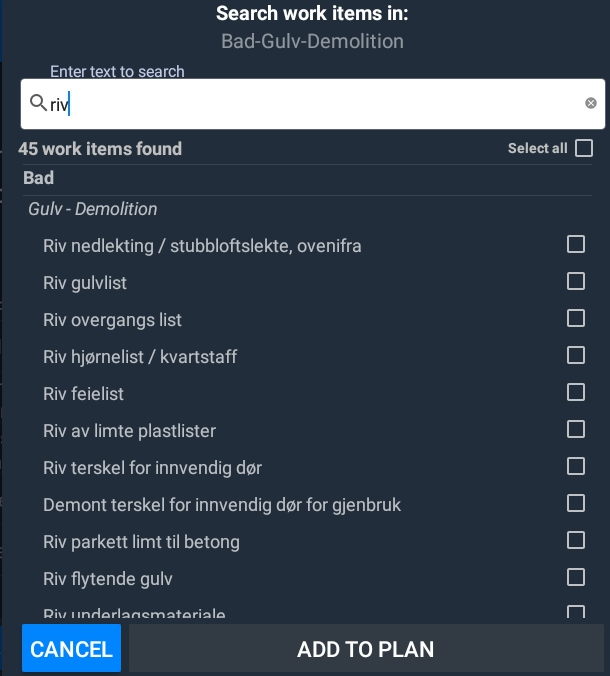
To add work items, mark the work items you want to add to the plan, then press ADD TO PLAN at the bottom of the screen. The items selected will then be added to the work plan, seen on the right side of the screen.

Many work items have a relation to other work items (e.g. if you demolish something, it might be that you will rebuild what was demolished). For such work items, when you add them to the work plan, you are asked if you wish to add related work items. You may then choose to add the related item (or items) or to just add the work item(s) you selected from the work item list to begin with. Related work items you choose to add will be added to the work plan in the same way as other work items.


To add amounts and/or materials to a work item, or to make changes to a work items which already has an amount added, simply press the work item. In the window that opens, you can write the amount manually, or you can use measurements from the floorplan if you have created a floorplan using in4mo FloorPlanner during the inspection.
For work items that include a possibility of there being materials involved, you can also select materials and prices here. You can choose between material from a supplier (provided that suppliers are integrated into the portal), standard materials from the in4mo system, or free text.
When you’re done, press SAVE to the bottom right, and you’ll be back to the work plan, where the amount and/or material has been added. Note that the amount may have been added also to other related work items using the same measurement. The same amounts are automatically being inserted for other work items that have the same unit type (e.g. m) and are in the same room and structure (for example the floor in the bathroom).

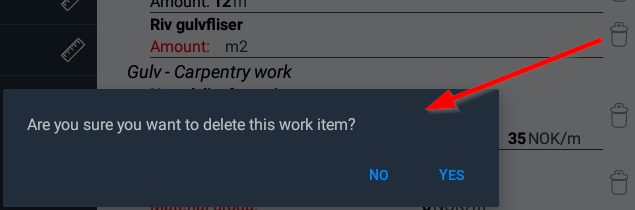
If you wish to remove a work item, this is done by pressing the rubbish bin to the right of the item you want to remove. A pop-up asking for confirmation will appear. Press YES to delete the item.
There are four buttons to be found at the bottom of the work plan. When pressing SEND AS DRAFT the work plan as it is will be sent to the server, meaning that it will be sent to the web portal. When you are done with the work plan, you can press INITIAL WORK PLAN READY, which will mark the work plan as being ready from your side. This is done to tell the insurance company that the calculation is ready, and that they can proceed with the case. It is still possible to edit a work plan after it is marked as above. The buttons for saving and loading templates are described further below.

Saving and Loading Templates
It is possible to save the current workplan as a template, which can be used later. When you press SAVE AS TEMPLATE you will be prompted to enter a name for the template. This name will be displayed on the template list when you wish to import work items from a template later. Note that templates you save from the tablet are only available for own use, meaning that they will be available both on the tablet and from the web portal, however they will only be available to you.

When you want to import work items from a template, press the LOAD TEMPLATE button. A list of available templates will appear. In addition to the name of the templates, there’s also information about who and where it is from. Own template means that the template is your own personal template. There could also be templates made by insurance companies which have been made available to their partner network, in which case the name of the insurance company is shown. For customers of in4mo Contractor, it is also possible that there are templates shared across the whole company available.
Creating a Work Plan from a Web Portal
In the web portal you will find two tabs which are related to iCC; Cost control and Work plan. The former displays actual costs and will be explained further later on. It is under Work plan that the work plan is made. To open the work plan, simply click on Work plan. Note that the availability of this button depends on what kind of role you have in the case. If you have been assigned to an inspection or project management you will see this button, if you have been assigned to a craftsman task only, you find the work plan in a different place, which is explained further in the section Creating a Work Plan for a Craftsman Task and Sending for Approval.
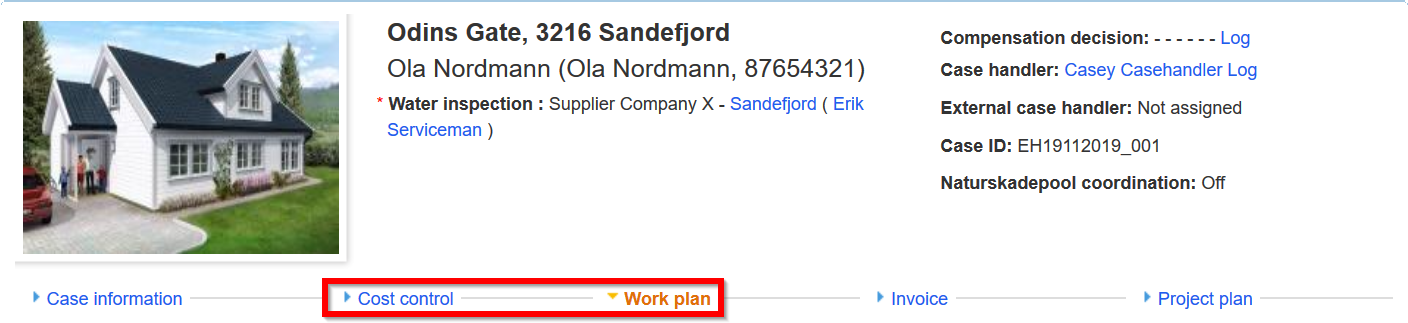
Under Work plan you will see all work items added to the case. You can add more work items from here, add or change amounts for added work items, add materials, delete work items, as well as saving and loading templates.
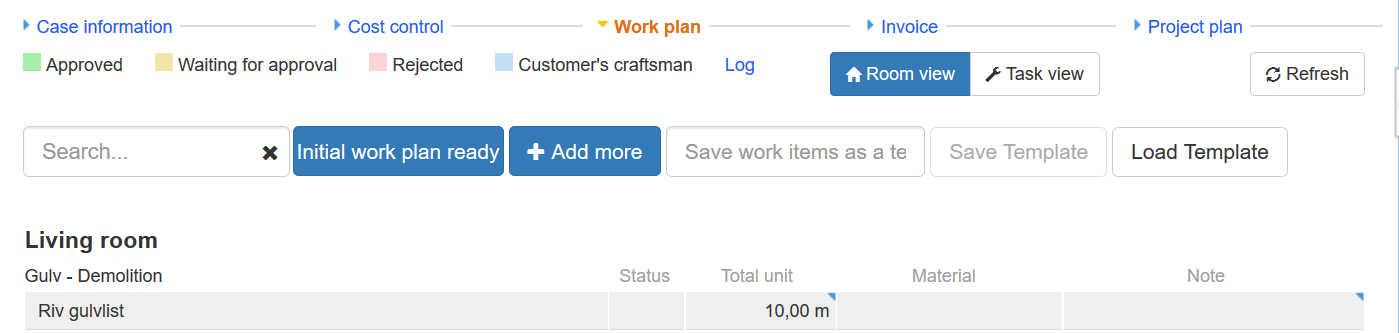
Below you will find a short explanation of the different functionalities in the work plan.

Lets you search for work items that have been added to the work plan Opens a new window where you can add more work items to the plan, as well as edit work items already added.

In order to save a work plan as a template, you must first give the template a name, which is done in this field.
Click this button to save the work plan as a template. Note that you must fill out a name for the template in the field to the left before it is possible to click this button. Depending on your role in the system the template will save directly for personal use, or you may get a choice whether it should be for personal use only or shared with others.
Click this button to import work items from a template. This will be explained further later on.
You can click these buttons to toggle between a room-based or task-based view of the work plan. This basically means how the work plan is sorted, whether it shows the work items per room, or per task. Whichever option is marked in blue is the currently active view. When a task-based view is activated there will also be an additional button for adding extra trips for the task available.
![]()
This marks the work plan as ready, meaning that you have confirmed that you are ready with the plan, which can then be used for preparing a cash offer, initiate an RFQ or assigning tasks to suppliers. This button appears once at least one work item has been added to the plan. It is still possible to make changes to a work plan after it has been marked as ready.

This icon is shown next to each task name in the work plan and is only available when the work plan is following the task view. By clicking this icon, you can add more trips for the task.
![]()
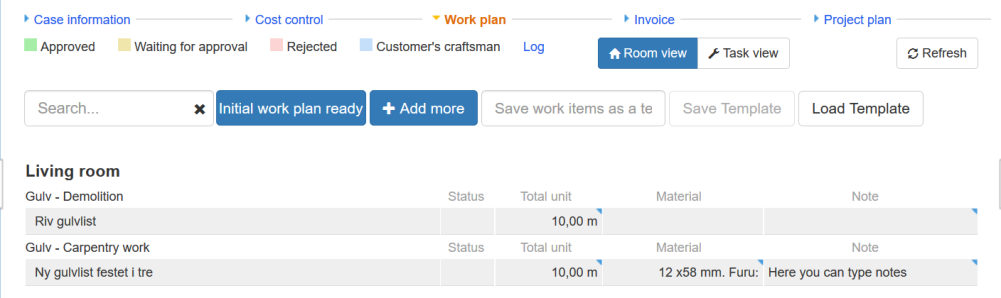
We start by clicking the + Add more button. A new window opens. You find many of the same buttons here as under work plan, with possibilities for saving and loading templates, and for toggling between room view and task view. If Room view is activated, the work item list on the left side shows the different rooms available, if Task view is activated, it will show the different tasks that exist in in4mo. Regardless of view, the same work items will show up, it’s just a different way of getting to the work items, and you can choose whichever you prefer.
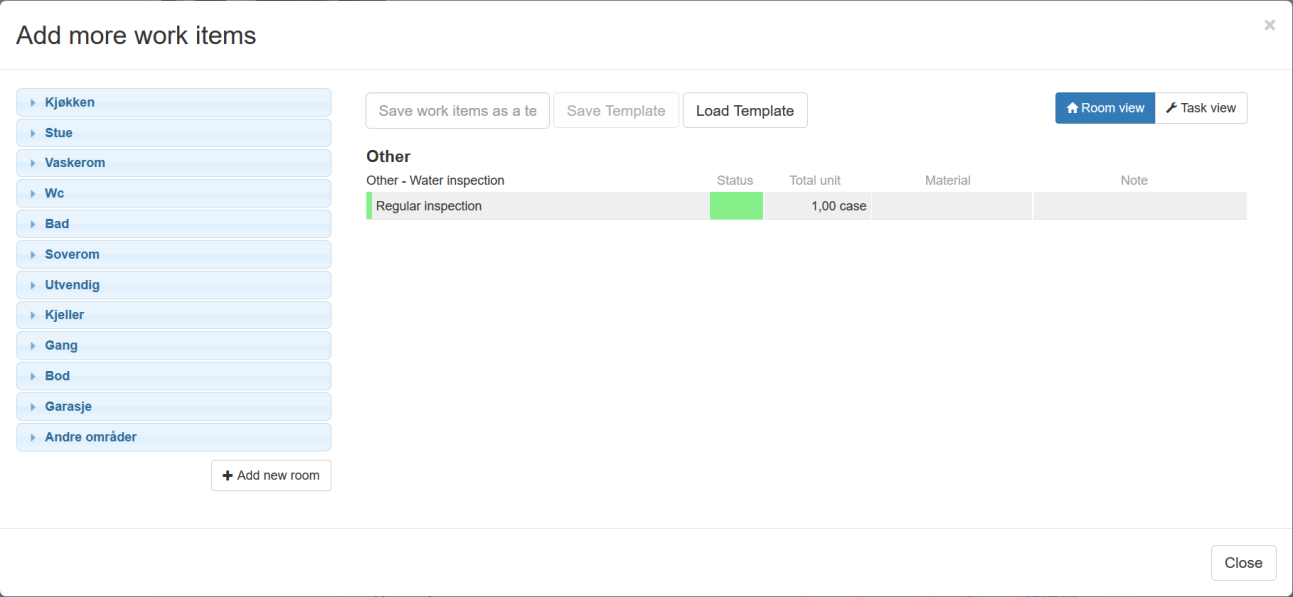
![]()
It is possible to add rooms to the case. At the bottom of the list on the left side you find this button + Add new room. When clicking this, a small window will open which lets you add a new room. You must select a room type and fill out a name for the new room.
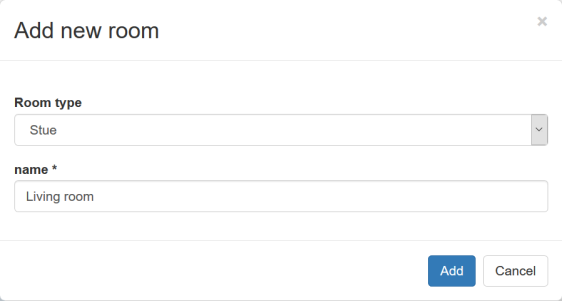
The new room is added to the list of rooms in the work plan and shows the room type in brackets.
![]()
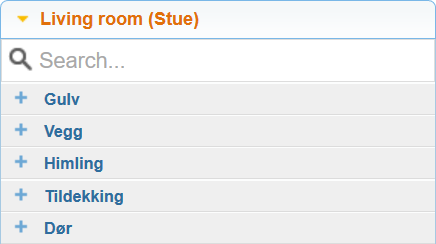
When you select a room, a new list will appear underneath this room, where you can select structure, e.g. floor, wall, door etc. When you have selected the structure, you will see a list of relevant tasks, e.g. demolition and carpentry work. When you have selected a task, you will then see all relevant work items based on the choices you have made in the list.
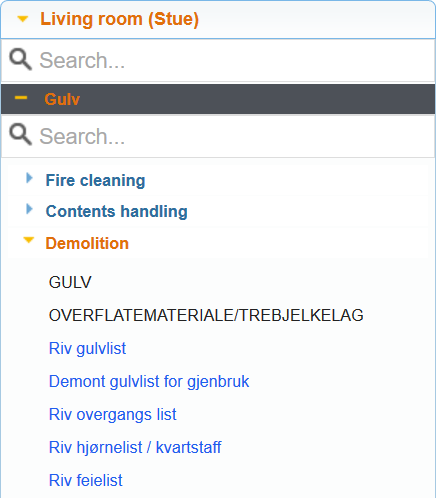
To add a work item to the work plan, simply click on the work item you want to add. If there are related work items, a pop-up will appear asking if you want to add the related work item(s). You can choose to add all related work items, parts of them, or to not add any related items.

When you add work items, you will see that they are missing values. Work items which are missing values are indicated with red text in the column Total unit. For work items which could have material costs, it will also be indicated with red text if no materials have been added yet. To add values, simply click on the row for the work items under the column Total unit. When you add a value to a work item which has related work items in the work plan, the input value will be applied also to the related work items.

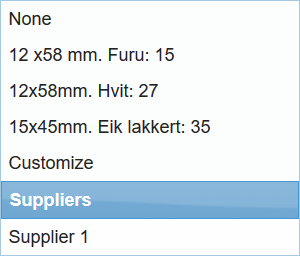
When you click on a row under the Material column, you will get different options. There are different pre-defined options from in4mo on the list, by selecting Customize you add a free-text item for which you add a price and descriptive text. Under Suppliers you will see a list of all suppliers integrated into the system. If there are no suppliers integrated into a portal, this part won’t show. By selecting a supplier, a pop-up will appear with relevant materials for the selected work item. You then select the material you want to add, and press Save. It is also possible to search for specific materials by using the search field to the top left. There is shown the price for the material, but this price can change dependent on to which part is responsible for the given task, the exact rules for how the prices are applied are described in appendix A: How material prices from suppliers are applied.
To the right in the work plan there’s a column called Note. Here you can freely write down notes if you wish. This is not compulsory, but it’s a possibility if you want to write down some extra notes about the work item.

For work items that are already added to the work plan, you can also add amounts, materials and notes directly under Work plan, without clicking the + Add more button first. This is done in the same way as described above.
It is important to note, that items that are not directly connected to the physical work, such as Project management, travels and extra fee for material handling, are often added to the calculation automatically. They are not shown in the work plan, but in the Cost control page, and will be explained in further below. The precise calculation logic of these compensations depends on the agreement between insurance company and the service company responsible for the given task.
Creating a Work Plan for a Craftsman Task and Sending for Approval
Depending on your role in a case, you may not have access to the overall work plan tab described above. This is typical if you have been assigned to a craftsman task, without having project management or an inspection in addition. In such cases, the work plan is added from a Work plan tab found when opening the task itself.
 Creating a work plan this way works the same way as described above, with the main difference being that you are adding work items for the opened task only, meaning that you won’t have the possibility to toggle between a room-based and a task-based view.
![]()
If you click this button an additional trip (meaning a trip from the office to the damage site and back again) for the task will be added to the work plan.
When the work plan is ready you can send it for approval, which can be done either from the Work plan view, or under Cost control. The latter is more practical if you’re going to send work items for several tasks for approval, as you are able to send items for all assigned tasks for approval at the same time, whereas under the work plan view for a task it is only possible to send work items for this task for approval.
If you send items for approval from the Work plan view, you start by selecting which items should be sent for approval. There’s a checkbox to the left from the task name above the work item table you can select to mark all work items. When you’re ready, click the Send for approval button below the table.
If you send work items for approval from the Cost control view, you will find a Send for budget approval button below the table. Click this, select which items should be send for approval, then click Send for approval.


Saving and Loading Templates
It is possible to save the current work plan as a template for later use. Depending on your role in the portal, you may be able to save the template for personal use or choose whether the template is for own use only or if it should be shared. To save the current work plan as a template, you must enter a name for the template, then click Save Template.

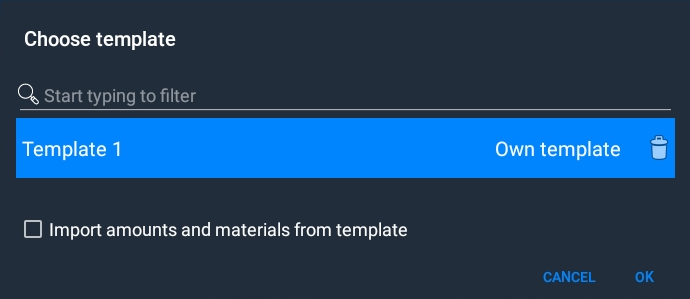
If you wish to import work items from a template, click on Load template. You will then see a list of available templates, both own templates, as well as shared templates. For own templates you will also see a red cross on the right-hand side, which can be clicked if you wish to delete the template. Select the template you wish to import to your workplan, then select which room the work items should be imported to, as well as whether amounts or materials should be imported from the template as well. If these boxes are unchecked, only the work items will be added to the work plan, while you have to add amounts and/or material manually. When you are ready, click on Apply Template to import the work items from the template.

Cost Control – Where You Can Follow the Costs
The Cost control tab is where you can follow the costs in a case, as well as having the opportunity to send work items for approval or to approve work items which have been sent for approval.
There can be differences in what kind of information you have access to under cost control, depending on your role in the case and what kind of permissions this role has in the portal in question. The same role can have different permissions in different portals, for example in one portal a project manager might have permission to approve budgets, while in another portal project managers don’t have this permission. This section will cover different functionalities under Cost control and depending on your role you might not have access to all of them.
As a general rule, suppliers can only see their own costs on the cost control page. The screenshots below are taken from a case handler’s point of view. The Cost control page consists of three separate tables. The first table consists of all the work items added to the case. The icon ![]() indicates who each work item is allocated to, that be an office from a partner network or to the customer. Work items can also be in a draft state, and not yet allocated, in which case there won’t be any black boxes for these items until they have been allocated.
indicates who each work item is allocated to, that be an office from a partner network or to the customer. Work items can also be in a draft state, and not yet allocated, in which case there won’t be any black boxes for these items until they have been allocated.
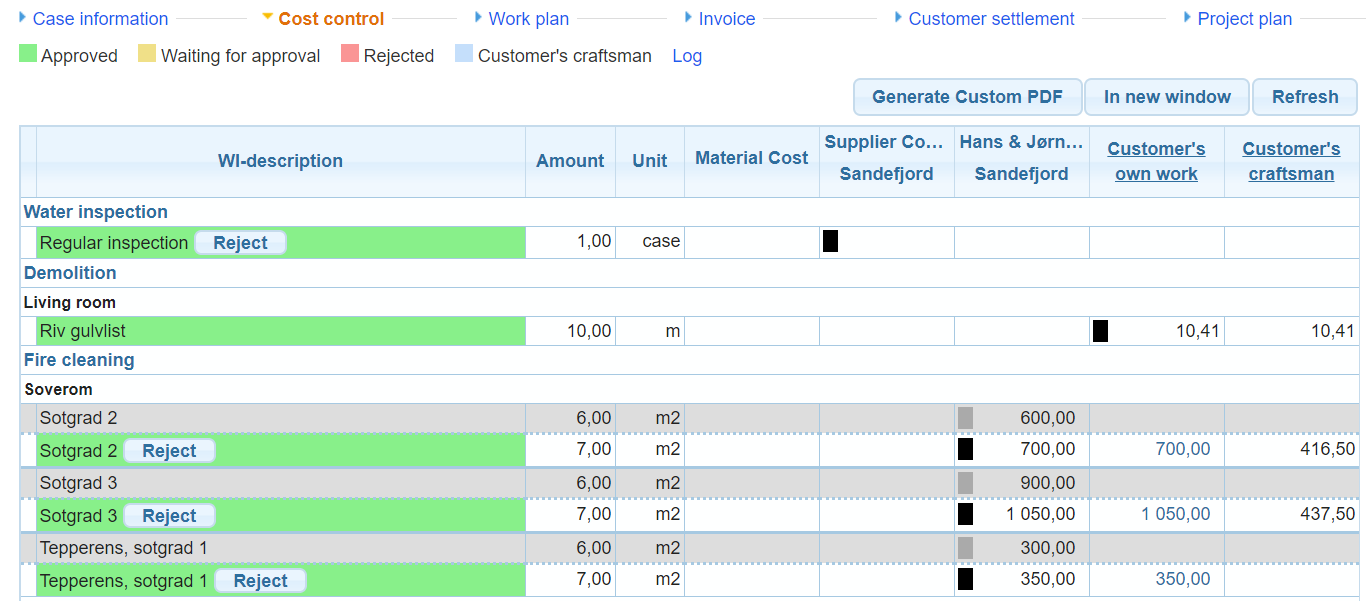
The second table shows admin and travel costs, as well as the cost of acquiring materials.

The travel costs that are shown here, is a total of the costs of travels that are added automatically based on specific rules in the given portal, plus travels that are added manually. When holding the cursor over the travel costs, it will be shown how many travels are added for each task. The manual trips are also shown separately in the first table.
Travel costs and costs of acquiring materials is shown only for approved work. Costs related to work items in draft and waiting for approval will therefore not be shown in this section. In Appendix B. Costs in the Cost control page, there is a detailed definition of the costs shown and how they are calculated.
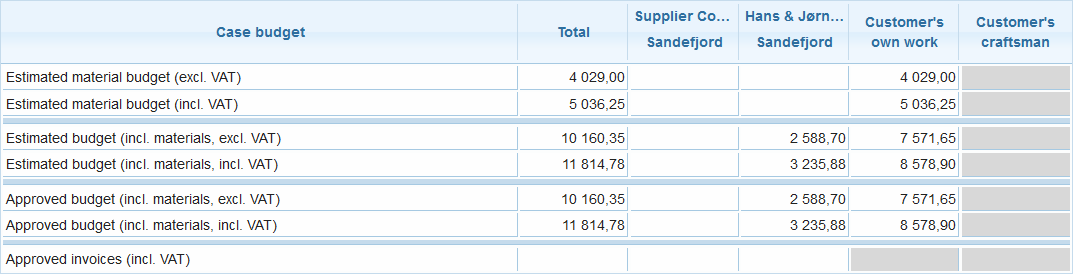
The third table shows the total costs for each company and the customer, and is broken down into showing the estimated material budget, with and without VAT, the estimated total budget including materials, both with and without VAT, and the sum of the budget which has been approved.
Approving and Rejecting Budgets
Budgets are approved or rejected under Cost control. Users who have the permission to approve budgets will see checkboxes next to work items that have been sent for approval. When marking a checkbox two buttons appear below the table; Approve and Reject. Work items that are approved turn green, while rejected items are marked in red. Yellow indicates work items which are waiting for approval. Work items in white are in draft status and cannot be approved before they are sent for approval.
You can mark each work item separately, or if you are going to make the same decision for all items, you can mark the checkbox next to a task name to mark all items sent for approval for this task, or the checkbox on the top left of the whole table to mark all work items which have been sent for approval.
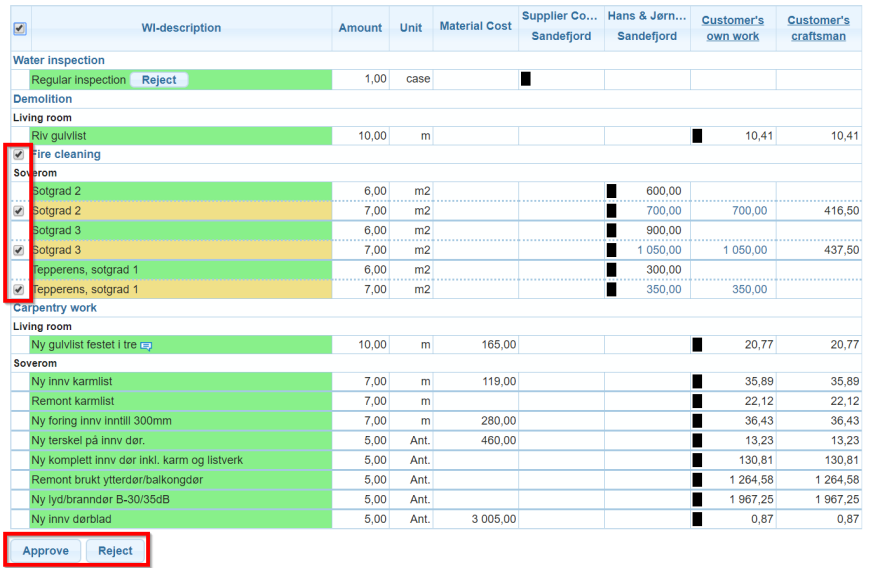
It is also possible to reject approved work items by clicking the ![]() button next to the item. Whether this action is available depends on the status of the task and to whom the work item is allocated. If a work item is allocated to the customer, it has to be reallocated away from the customer before it can be rejected.
button next to the item. Whether this action is available depends on the status of the task and to whom the work item is allocated. If a work item is allocated to the customer, it has to be reallocated away from the customer before it can be rejected.
If changes are made to previously approved work items, the items have to be sent for approval again. When the new items have been approved, the previously approved work items are shown in grey above the updated work items, shown in green.

Allocating Work Items to the Customer or the Customer’s Own Craftsman
In the Cost control you find two columns to the right of the table: Customer’s own work and Customer’s craftsman. The latter is an optional feature, so if you can’t see this column, this feature is not in use in the portal.
In order to allocate work items to customer’s own work or to the customer’s craftsman, a user must have a role in the case which gives permission to do so. Only the insurance company has permission to allocate costs to the customer’s craftsman, whereas also other users may have access to allocate work items to the customer’s own work. Work items allocated to the column Customer’s own work make the basis from which a cash offer is made.
There are two ways of allocating work items to the customer’s own work. It is possible to click on the sum shown for a work item under the column Customer’s own work, after which this particular work item is allocated to the customer, and the ![]() icon will reflect that this item is allocated to the customer.
icon will reflect that this item is allocated to the customer.
The other way to allocate work items to the customer is to click the text in the column title Customer’s own work.
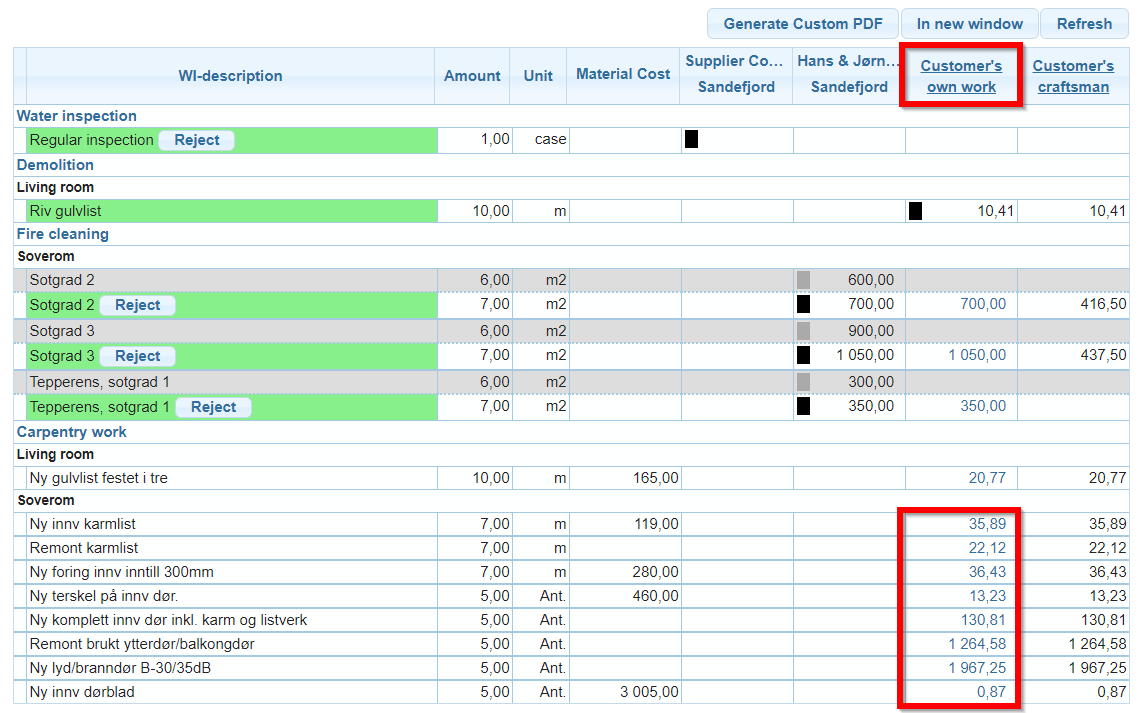
A new window opens where you can see all work items in the case. Work items which are possible to allocate to the customer will have a checkbox next to them. Mark the work items you wish to allocate to the customer, then click Save to confirm. From this window it is also possible to reallocate work items away from the customer, by making sure the work items are not marked in the checkbox, then saving. If you reallocate work items that were previously at the customer, the work items will be set back to draft status, regardless which status they were before being allocated to the customer.

When allocating costs to the customer’s craftsman, whole tasks are allocated instead of individual work items. When you click on the text in the column title Customer’s craftsman a window pops up, where you will see a list of the different tasks in the case, and the estimated costs for the tasks. You then fill out the sum you will offer the customer for a task and click Save. The ![]() icon will be displayed both next to the work items under this task in the cost control, as well as next to the task name itself. The amount of compensation is inserted as one total amount covering both work and material, and should be inserted incl. VAT. When it is shown in the Cost control, it will be shown as excluding VAT in the work item-table and including VAT in the totals.
icon will be displayed both next to the work items under this task in the cost control, as well as next to the task name itself. The amount of compensation is inserted as one total amount covering both work and material, and should be inserted incl. VAT. When it is shown in the Cost control, it will be shown as excluding VAT in the work item-table and including VAT in the totals.
 Work items can be allocated to Customer own work when a task is in status C -> status 3. Work items can be allocated to Customer craftsman in status C –> status B++.
Create PDF from Cost Control
It is possible to create a PDF which shows the work items in a case. Under Cost control there’s a button called Generate Custom PDF.

When you click this button, a pop-up appears where you can define what should be included in the document. When clicking Report templates you will find some pre-defined selections, which will select different parameters from the categories below. By clicking on each category, you will see different checkboxes. Each checkbox you mark will be included in the document. When you are ready, click Generate PDF to create the document. If you click Save to documents the document will be added to the document library in the case. These files are added as own documents, meaning that only users with the correct authority will be able to see the file.

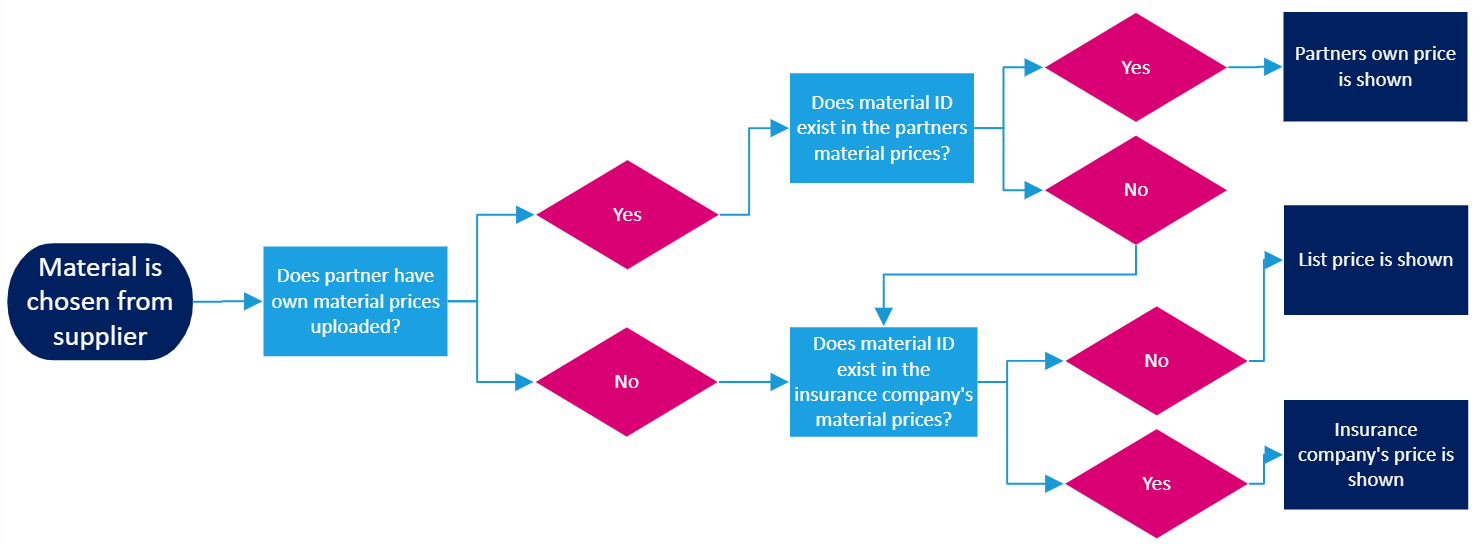
Appendix A: How material prices from material suppliers are applied
When a work item has material from a material supplier, the price that is shown can be fetched from three different sources: List price, i.e. shop prices without any discount; insurance company’s price, if the insurance company has own prices for the material uploaded in the portal, and partner company’s price, for partner companies that have uploaded own prices per material.
Which price that is shown for a given material in a given case, depends on different factors, such as status of the task and portal settings. Below are diagrams for which price will be shown: If portal is not configured to always use insurance company’s own prices Work item is assigned to partner: Work item is unallocated or allocated to customer’s own work:
If portal is configured to always use insurance company’s own prices
Work item is assigned to partner:
Work item is unallocated or allocated to customer’s own work:
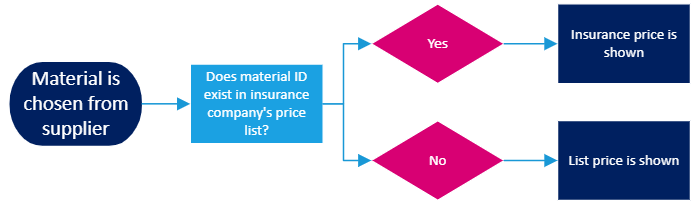
If portal is configured to always use insurance company’s own prices
Always:

Appendix B: Costs in the Cost control page
In this section it will be further elaborated how the costs shown in the Cost control are established. As mentioned earlier, the Cost calculation table is divided into three sections: Work item table; Admin & Travel costs; and Total costs.
Work item table
Below is an example of a work plan, with some relevant costs pointed out as examples:
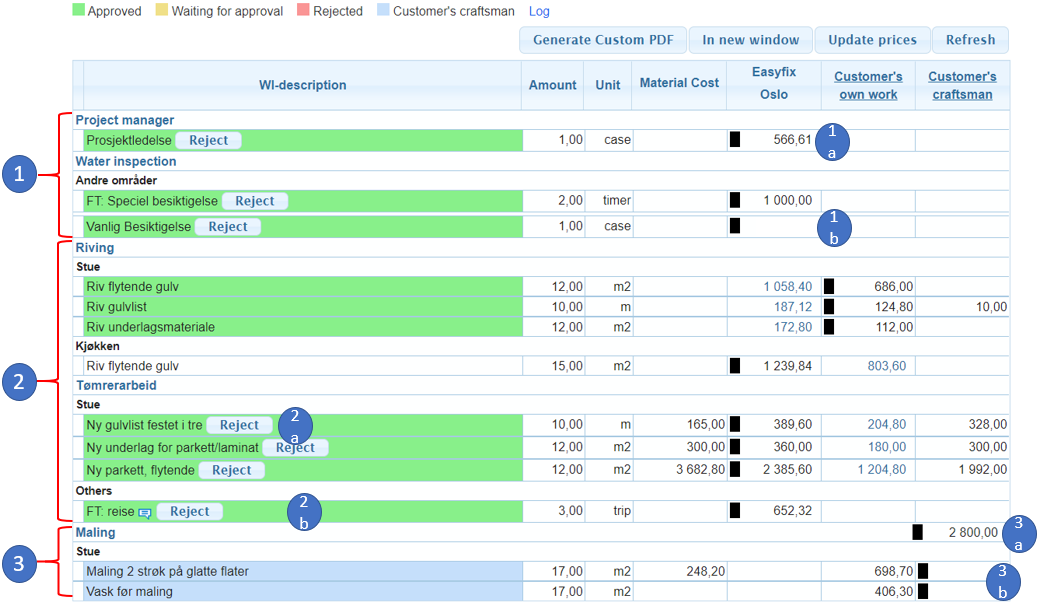
1. Inspection task and Project management task: Each task has one value that is reserved for the rules for automatic price that is defined for the given office, as in 1a. If no rule is defined, the field will be empty.
Besides the automatic price, there can be manually put extra work items, for example free text work items, as in 1b.
2. Work items for repair tasks: For all repair tasks (e.g. Demolition, Drying, Carpentry, painting, etc.) each work item’s price is split up into separate prices for Material cost and work cost (it is important to remember that work cost is the pay for the work hours + small consumables, as stated in the iCC principles). For example, in dot 2a there is work item “Ny gulvlist festet i tre”, for the 12 meters added, there is shown a material cost of 165 NOK and the work price is 686 NOK. The total cost for the work item is these two summarized, i.e. 851 NOK, which is not explicitly shown.
For the materials, the cost shown is including the waste percentage for the work item. However, if the material is chosen from a material supplier and the units are mismatching, for example unit is pieces from the material supplier and work item in iCC is m2, then the waste percentage is always zero.
A special sub-set of work items are the Trips. These are travels that has been manually added, as in dot 2b.
3. When a work item is assigned to the Customer craftsman: The work item is marked as blue, and the single work item prices are disregarded, meaning neither the material nor work price is used.
Instead there is only a total cost on task level shown on the same row as the task name, as it is in 3a, and the work price for each work item is empty, as shown in 3b.
Admin & Travel
In the Admin & Travel costs section, the shown costs are based on automatic rules defined by the insurance company and partner company. In this example case there is:
4. Admin cost is in this example based on the rule that first task gives 200 NOK and each following task gives 100 NOK in compensation. Easyfix has four tasks assigned (Project management, inspection, Demolition and Carpentry), and thus is compensated with 500 NOK.
5. Travel cost, in this table shows the total of all costs marked as travels for the partner. That means that it is a total sum of costs for both manually added travels and automatically added travels. In this example case partner is compensated automatically with 1 trip for water inspection and 1 trip for Carpentry. And as can be seen in the work item table above in dot 2b, partner has also manually added 3 trips for the Carpentry task. The 1087.20 NOK that is shown as travel costs are then the compensation for all five trips.
6. Cost of acquiring materials are in this example based on the rule that 10% of approved material costs, excl. VAT should be compensated. The material that is approved for Easyfix in this case is amounting to 4147.80 NOK and therefore 414.78 NOK is added as compensation for acquiring materials for Easyfix.
Total cost
This section shows sums of the above costs.

7: Estimated material budget is the total of material costs for work items. In the example above, it covers all the material costs in the material column for dot 1 and dot 2 in the Work item table. More precisely, following is covered:
| 7a Estimated material budget (excl. VAT) = All material costs for work items in status draft + All material costs for work items in status waiting for approval + All material costs for work items in status approved |
7b Estimated material budget (incl. VAT) = Estimated material budget (excl. VAT) + Estimated material budget (excl. VAT) x VAT percentage |
8. Estimated budget is the total of all costs. It covers all work items and the Admin & travel costs. Work that is transferred to customer own work never includes VAT on the work price. Following is covered:
| 8a Estimated budget (excl. VAT) for partners = Estimated material budget (excl. VAT) + work costs for work items that are in status draft, awaiting approval or approved + Admin costs + Cost of acquiring material + Travel costs – Travels from work items table* |
8b Estimated budget (excl. VAT) for customers own work = Estimated material budget (excl. VAT) + work costs for work items that are in status draft, awaiting approval or approved + Admin costs + Cost of acquiring material + Total Travel costs – Travels from work items table |
* The reason for subtracting the manual added travels (dot 2b in example above) from the total travel costs is that they are counted in the 5. Travel costs total.
| 8c Estimated budget (excl. VAT) for customers craftsman = All tasks level amounts that are assigned to Customers craftsman |
8d Estimated budgets (incl. VAT) for partners = 8a Estimated budget (excl. VAT) for partners + 8a Estimated budget (excl. VAT) for partners x VAT percentage |
| 8e Estimated budgets (incl. VAT) for customers own work = 7b Estimated material budget (incl. VAT) + all work item costs excl. VAT* + Admin, Costs for acquiring material |
8f Estimated budgets (incl. VAT) for customers craftsman = 8d Estimated budget (excl. VAT) for customers craftsman + 8d Estimated budget (excl. VAT) for customers craftsman x VAT percentage |
* Here it is important to note, that for the work item costs, VAT is never being added when assigned to customers own work. VAT is added for material costs, but not for work.
9. Approved budget shows the cost for work that is approved. The calculations for partner, customer own, and customers craftsman should be done as in dot 8.Estimated budget, but only for work marked as approved or assigned to Customer craftsman, i.e. marked with green or blue colour in the Cost control table.