


Project Manager
These instructions will explain the basic steps and actions the project manager have to know to get all the benefits of in4mo.
Project manager role
When a company has been assigned a project management task in a case, the task can be seen in the task list in the specific case.
Depending on the insurance company configuration, some steps might already have been done by the insurance company, who is handling the case.
NOTE! A company can be assigned Project management tasks only, when the task has been selected as one of the provided services in the office information, via the page Company admin > Offices.
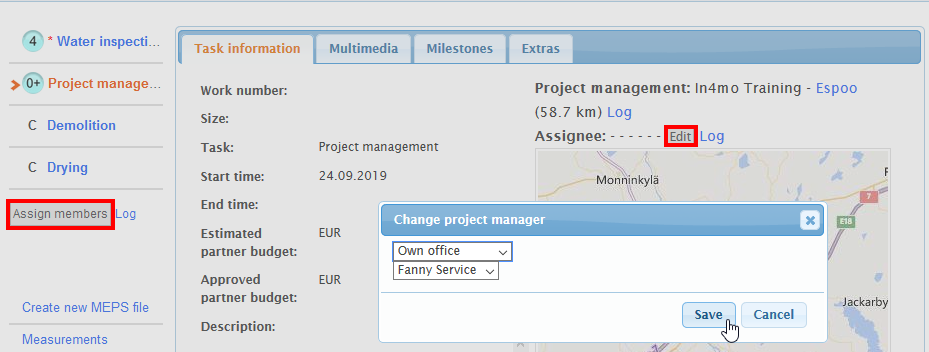
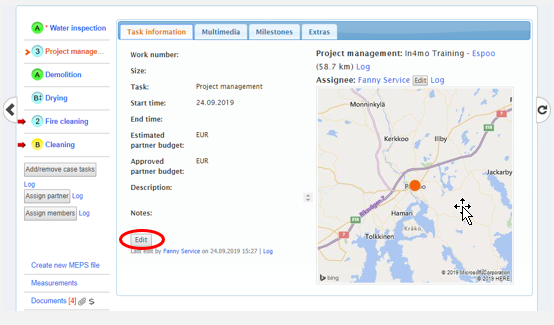
Assigning the Project management task can be done, by clicking the
Edit link above
the map in the task. Assigning a project manager can also be done, by clicking the Assign members button under the tasks to the left.

The project manager needs to look over the case for to determine needed actions. Main tasks are to set the schedule for the entire case, check that the work is done properly and on time, and report the progress of the case if needed.
![]() If a positive compensation decision is made and after the project manager is chosen – the task switches the status automatically to status
If a positive compensation decision is made and after the project manager is chosen – the task switches the status automatically to status
If the main inspection is not in status A, the project manager can still assign and set schedules for tasks.
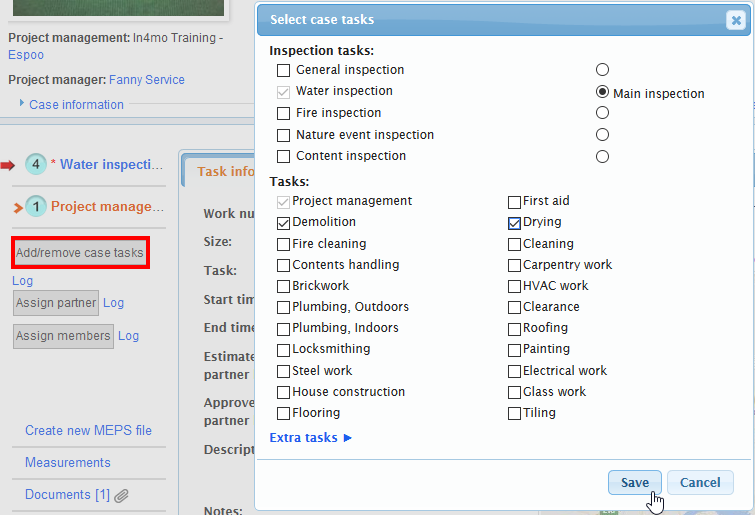
Task(s) can be added/removed in a case by clicking on Add/remove case tasks under the task list. Two case tasks can be added of the same type in one case if needed. In this case, it is needed to click on Extra tasks
and choose an extra task from the list that appears below. Last step is to click Save after all the selections has been made and they need to be confirmed.
Assign tasks to companies
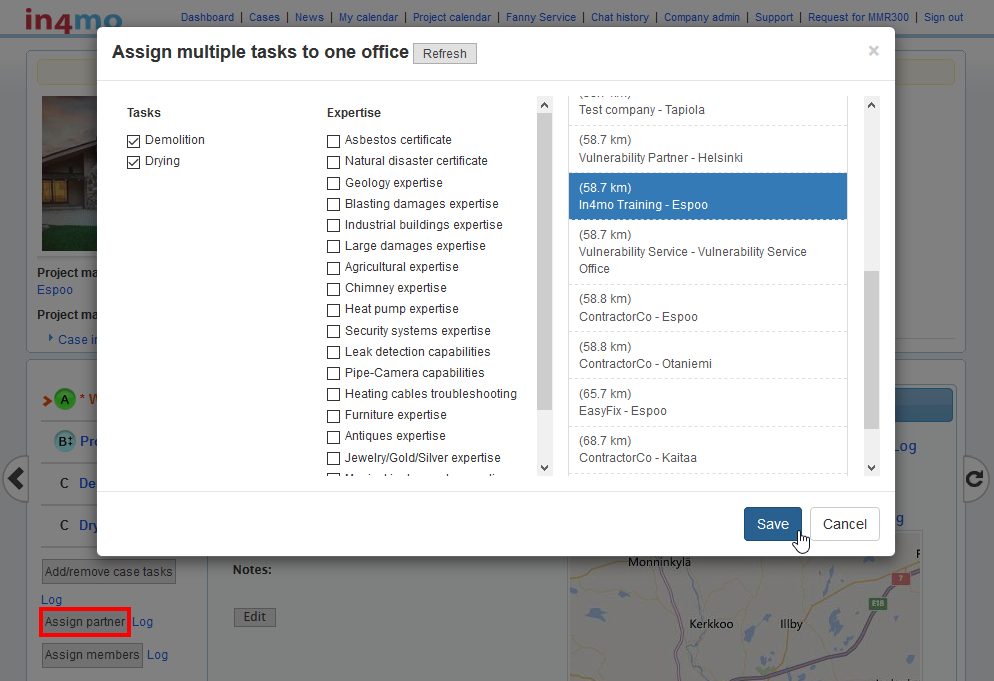
Once all the tasks have been added, it might be possible to assign the tasks to own company or to another partner of the insurance company, that is if the insurance company has given the rights for this.
By clicking the Assign partner button and checking the task(s), it is possible to assign the task(s) to the same company. The last step is to select the partner from the Recommended office list to the right and click Save.
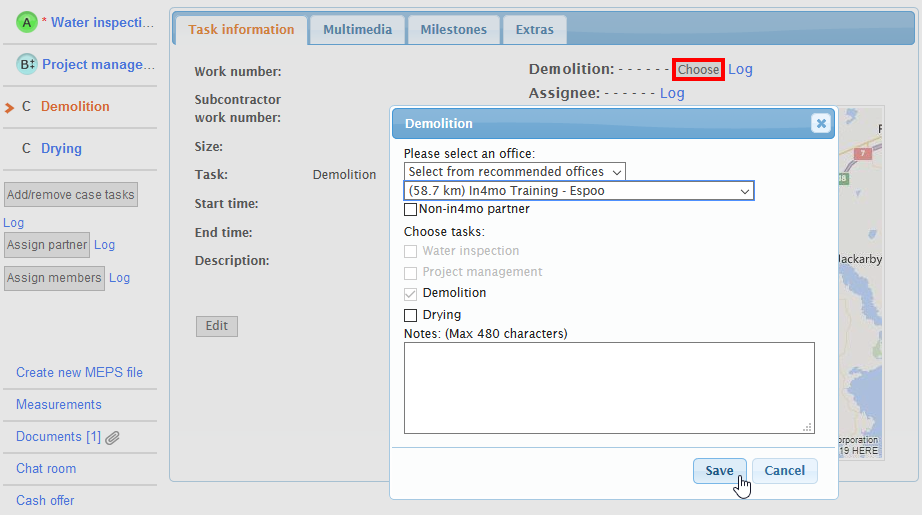
Alternatively, the task(s) can be assigned also to a partner in the task by clicking Choose.
Assign tasks to responsible employees
Task(s) can only be assigned to employees which have been assigned to their own company.
In the task list, a task needs to be selected first to which a responsible person needs to be assigned for. When the task has been selected, the next step is to click Edit on the right next to Assignee above the map. A pop-up window will appear as shown below.

If needed, separate information text can be filled out about the task in the Description box. However, it is not mandatory.
By choosing the option Whole company from the dropdown list, it is another way to possibly find a person, if they cannot be found under the default option Own office. Both of these lists, will only show employees that have been certified by in4mo.
To assign a person to the task, the name of the person needs to be selected first under the Employees list and after that, the arrow in the middle that points to the right, needs to be clicked, so that the name moves under the Assignees list.
When a task has been assigned to a responsible person the status for the task(s) switches to status ![]() .
.
If possible, a scheduled start and end time is good to set as well, after a responsible person has been assigned to the task(s). However, the scheduled time can be updated later from both the web portal and the mobile application.
When a scheduled start and end time are set along with a responsible person, the status for the task(s) will switch to ![]() .
.
Multiple task assignment
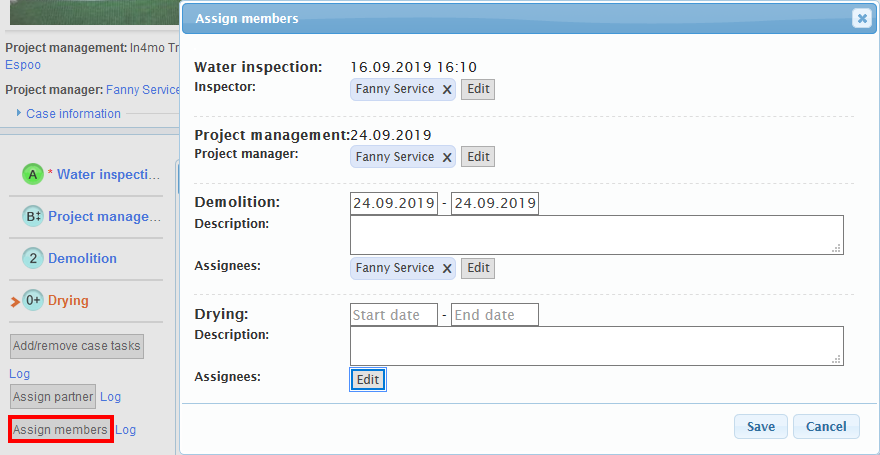
Multiple tasks can also be assigned to responsible person(s) at the same time and/or set a scheduled start- and end date for all the tasks at once.
By clicking the Assign members under the task list to the left, after own company has been assigned to the tasks, a pop-up window will appear showing all the tasks assigned to own company.
Descriptions can be typed as well as scheduled start and end times, can be set and/or modified for each task separately. To choose or edit assignees, click Edit
next to Assignees.

In the next pop-up window that opens, the person(s) needs to be selected from the Employees list to the left, to which the task(s) should be assigned to. To the right, the available task(s) in the case are shown, for which the person(s) can be assigned for. When the selection(s) has been made, the next step is to click Save to confirm the settings.
To remove a person from a task, the x icon needs to be clicked next to the person’s name, which will then remove the person from the Assignees list. Another way is also to untick specific tasks that have been selected before for the person.
NOTE! If a person has not been certified by in4mo, then it is not possible to select a task for this specific person. In this case the system informs it with a ![]() when you have the mouse over a selection box for a task.
when you have the mouse over a selection box for a task.
By clicking the start or the end dates fields, a scheduled start and end time can be set or modified for each task separately. By default, when clicking on the Start date field and a date from the calendar that opens is chosen, the system will automatically fill out the End date field to be the same date, so this is good to keep in mind that if needed, it needs to be edited separately. When modifying the dates that have already been set after saving, the system asks (which is optional to fill in), what is the reason for the changing of dates.
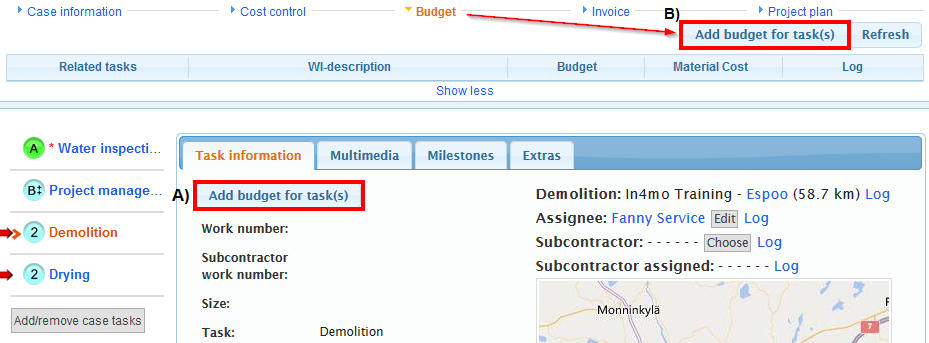
Add budget to task(s)
This next part explains how to add budget(s) to task(s) in cases. If iCC (in4mo Cost Calculation) is activated in the portal, there are separate instructions available for that, which can be read more about here and here.
Generally, all tasks (except inspection, first aid and project management tasks) require a budget to be accepted by the insurance company, before the actual reporting can be started from the mobile application. This applies if the insurance company has not set the budgets to be
pre-approved for tasks.
The company that has been assigned for the task is also responsible for adding the budget, meaning budgets can only be added to own tasks. Budget(s) can be added only when the task(s) is/are in status ![]() .
.
To add the budget (there are two options to choose from):
- By going to Task information in a task and clicking the Add budget for task(s).
OR
- By clicking the Budget sub header of the case and clicking the Add budget for task(s).
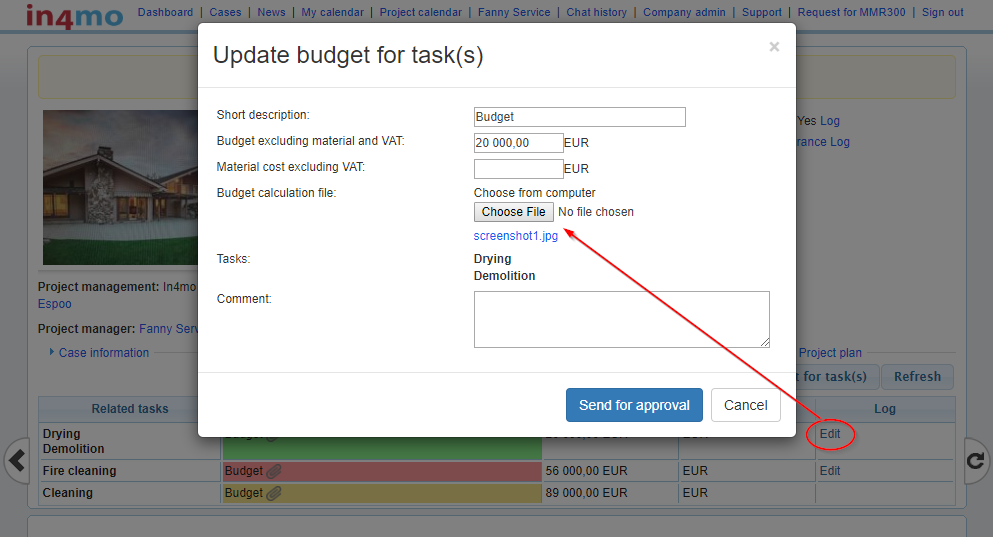
In the pop-up window that opens, a short description for the budget, the total amount excluding material and VAT and a budget calculation file from your PC, needs to be added so that it is possible to proceed. NOTE! Without a budget calculation file, a budget cannot be sent for approval.
The task(s) that are related to the budget need to be selected. A comment can also be added for the budgets if desired, but it is not mandatory.
When all the information has been filled out, the next step is to click Send for approval. The task(s) which a budget has been sent in for approval, switches to status ![]() .
.
Updating budgets
 If the budget needs to be modified, it can be done by first clicking on the Budget tab on the sub headers, and then Edit on the right of the task under the Log
column.
NOTE! A budget and the calculation file can only be modified when the budget is either rejected or approved.
When a budget is approved, the status of the task switches to status ![]() and the WI (Work Item) description field turns to green from yellow.
and the WI (Work Item) description field turns to green from yellow.
When the status of the task is B++ the reporting from the mobile application can start, depending of course if the compensation decision is positive for the case.
When a budget is rejected, the status of the task switches back to status 2. The description field is then red. The information can then be modified by clicking Edit.

 When a budget is updated in an ongoing task (the task is in status 3), the status of the task switches to
 ![]() . This means that the work can continue, but only the original budget is approved, until the insurance company approves the updated budget. If the insurance company rejects the updated budget, task will switch back to status 3 and the work can still be continued normally.
. This means that the work can continue, but only the original budget is approved, until the insurance company approves the updated budget. If the insurance company rejects the updated budget, task will switch back to status 3 and the work can still be continued normally.
NOTE! A task cannot be marked as completed in the mobile application until the budget is approved and the status is back in 3.
The budget can still be modified when the task has reached status 4 or A as completed/approved, but instead of the budget being modified – a new budget will appear for the task instead and the old budget will still be visible, but with a white description field.
Starting and managing the reconstruction project
The project management task will switch to status 3 when the reporting from the damage site in the repair project starts (two options):
 By the project manager when (s)he reports the first item in the project management task on the mobile application e.g. a picture is taken.
OR
- When the assigned person for the first repair task starts the reporting by taking the first picture.
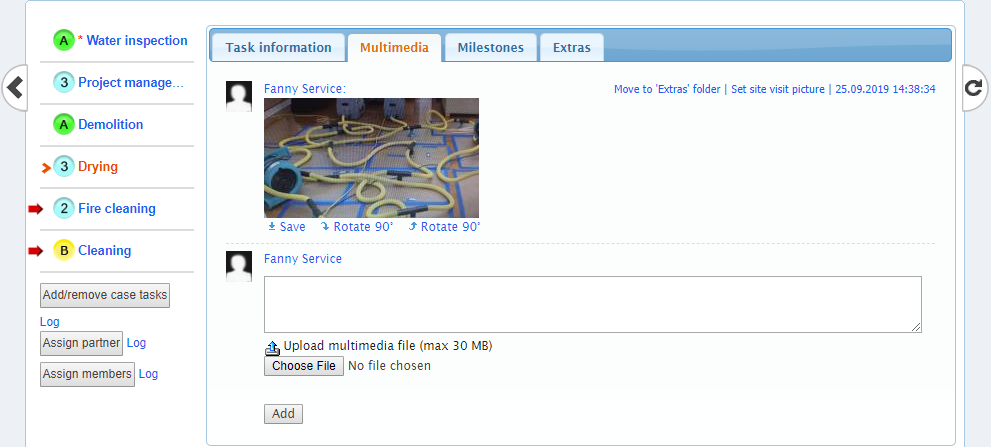
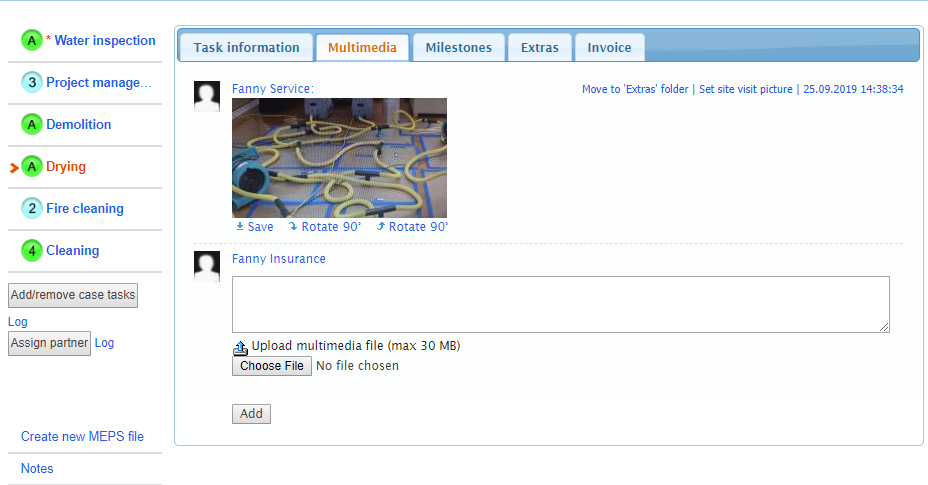
When the project management task is available in the mobile app, it is possible to report from the damage site if needed. The reported items will be synchronized and visible in the Multimedia tab of the task in the web portal, as in any other task.
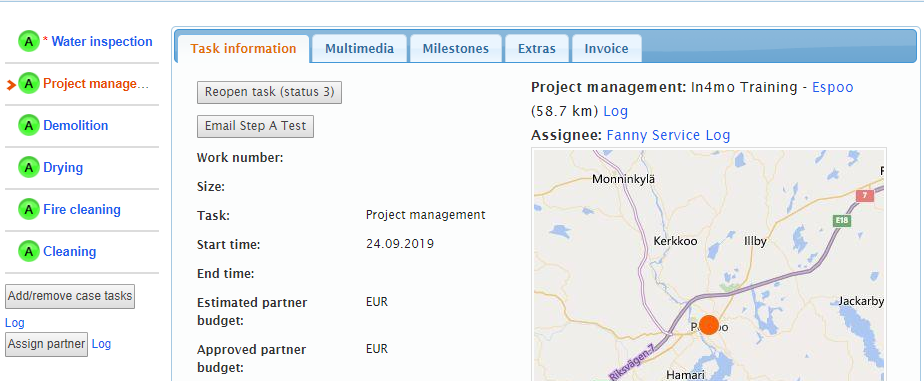
If the task information for the project manager task needs to be modified, it can be done by clicking on Edit in the Task information
tab of the task.
NOTE! The start time of the project manager task is automatically the time when the task was assigned to the partner office.
Approve and complete task(s)
By clicking the sub header Project plan, all the tasks can be seen in the case including details about the assigned person(s), as well as the scheduled start- and end times. Report items can be viewed via the Multimedia
link next to the End time column.
Here it is possible to follow up, that all steps are completed for the task(s) and that the work on the damage site is proceeding.

If information, like the reported item(s) is needed to be viewed of a specific task, it can be done by clicking the Multimedia link.
When the assigned person(s) of their assigned task, has marked their task as completed (the status is in status 4), each task is to be either approved or rejected by the project manager.
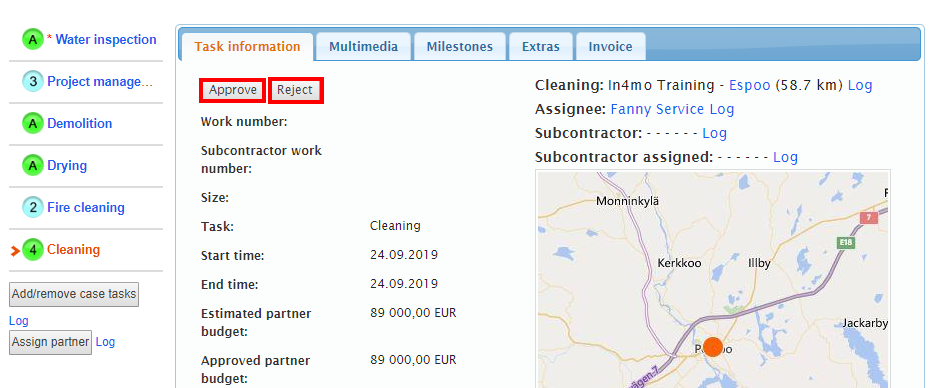
When all the repair tasks in the project are marked as approved and are in status green A, the project manager’s task status switches automatically to 4. The Approve button appears in the Task information tab when the task is in status 4. The Reject button appears when the task is in status 4, so if it is considered that the task has not been completed, then the Reject button can be clicked, which will then switch the task’s status back to status 3.
Once the repair tasks have been approved, the project manager can:
- Create and assign more tasks to complete the reconstruction project
OR
- Mark the project management task as completed. When marking the project management task as approved, the status for the task switches to status A, like in the other repair tasks.
If more tasks need to be added, then it can be done by clicking the Add/remove case tasks
button. Otherwise, the project is now completed.
 NOTE! Project manager needs to check the task(s) and do the final approval for them, so the task(s) switch their status to
 ![]() .
.
In some insurance companies, it is required that all the task(s) need to be either in status A or C, so that the case handler can later close the case.
Add and send invoice for approval
To add invoice to task(s), it can be done by clicking from the sub headers the
Invoice tab and then, by clicking the Add invoice to the right.
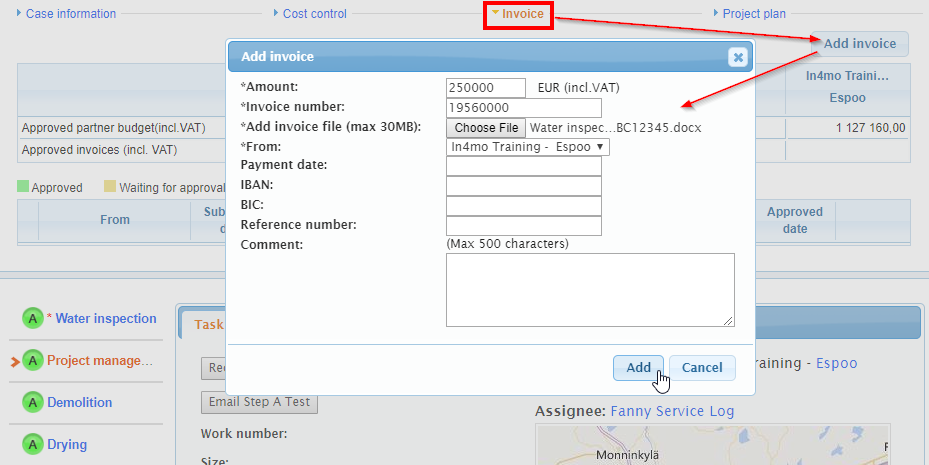
In the pop-up window that opens, information about the invoice can be filled out. There are a few mandatory fields such as Amount, Invoice number and who the invoice is from that need to be specified. Also adding an invoice file is mandatory. Other fields are optional to fill in. When all the information has been filled out, then by clicking the Add button, the invoice will be added to the case.
 Only those members of the company who have the right to see the budget can add/see/modify invoices for the company offices. The Can see budget needs to be activated for those members, who need to add/see/modify budgets and invoices for cases. This setting can be found on the page Company admin > Members.
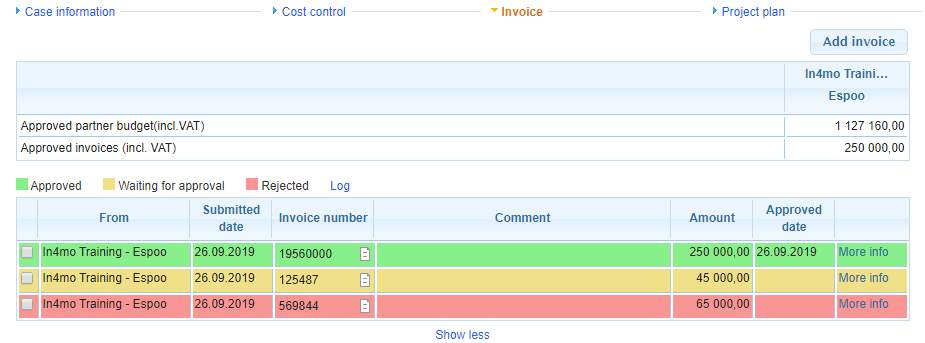
All invoices will be saved both under the Invoice tab in the sub header menu and in the Documents library. An invoice icon  will also be visible on the case list for the case.
All invoices will be sent for approval to the case handler, who can either accept or reject the invoice. Once the invoice is approved, it can still be rejected afterwards. The same goes for invoices that have been rejected, they can still be approved afterwards.
Insurance company users can also attach invoices on behalf of the company. NOTE: It is possible to see only own company’s task’s invoices in a case.