iCC Work Plan in the Web Portal
Using iCC to estimate the cost of a repair project is fast and easy. It can be done both in the Task Reporter app and in the web portal. In this document we focus on how to do it in the web portal.
Overview
This serves as a quick guide to the work plan feature, which is part of in4mo Cost Calculation (iCC). Here you will see how the work plan works; how to set up a work plan, both from the web portal and from a tablet, as well as some other possibilities you find in the plan. Finally, there is a short explanation of how work items are sent for approval (i.e. how a budget is sent for approval). More features are explained in more detailed, separate instructions.
An Overview of the Workplan
To open the work plan, click on the “Work plan” tab in the work bar. This opens the work plan, where you will see the work plan for your case, as it is at the time you open it. Depending on your authority and role in the case, you may have access to the work plan for the entire case, or just for task(s) assigned to your own company/office.
On top of the work plan you find the top bar, where you find different buttons. The top bar is locked so that it is always available regardless of how big the plan is, no scrolling up and down is needed.
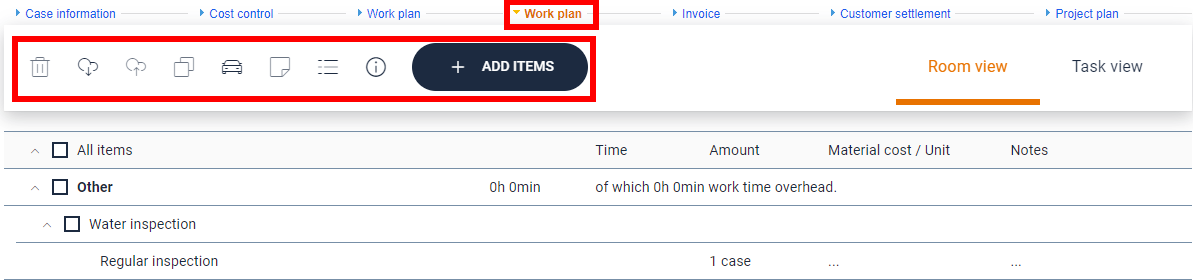
The icons are greyed out when they cannot be used, and a help text is available when mouse over.
 |
Delete work items |
 |
Load template |
 |
Save as template |
 |
Copy work items to a room |
 |
|
 |
Add manual trip Mark initial workplan as ready |
 |
Log |
 |
Download the iCC principles document |
 |
Add work items to the plan |
Creating a work plan from the web portal
There are different ways in which you can create and update work plans. The different ways to do this are described below.
Add items from full list
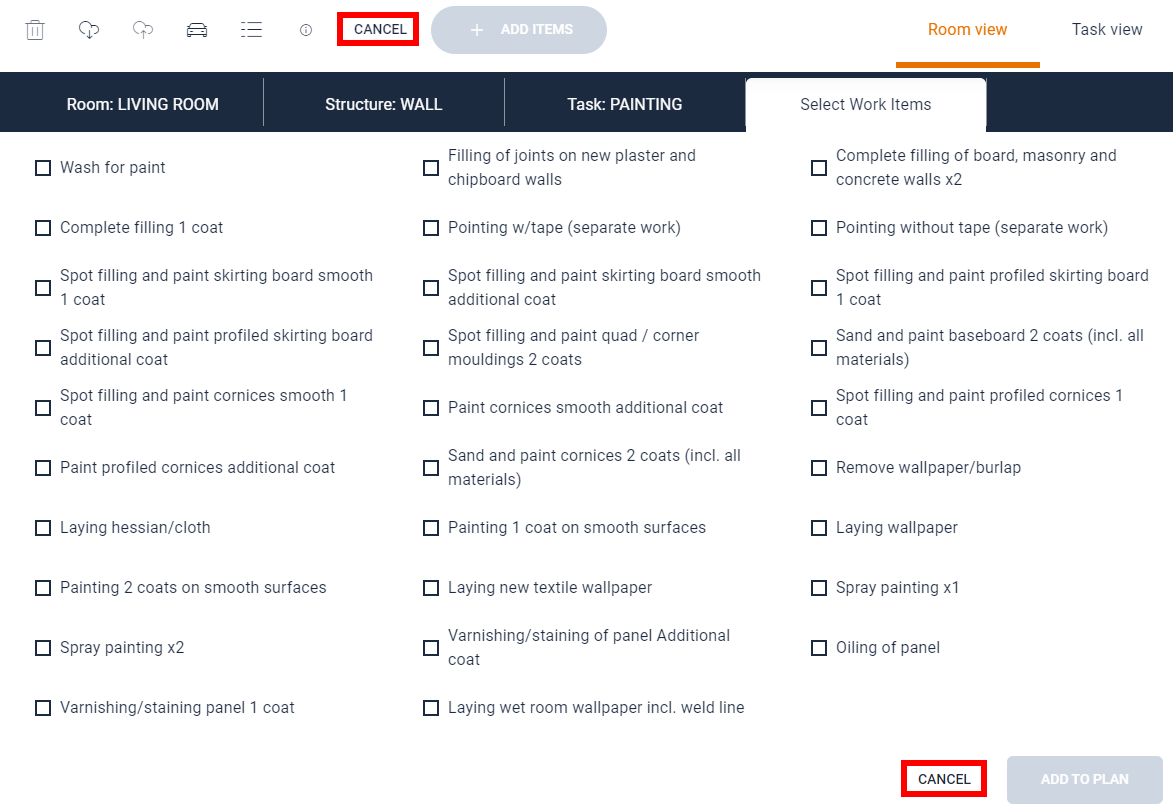
When starting a new workplan or adding new tasks or rooms the way to add items is by clicking the + ADD ITEMS button. Depending on if the Room view or the Task view is selected the view will be slightly different due to the order the coming steps will be done.


When selecting room for the first time the affected rooms must be added. This is for limiting the options to the needed ones for the future. It is always possible to add more rooms later.

The added rooms will then be visible and can be selected directly under the Select a Room tab.

When one selection is done it is shown in the tab header and the next tab is opened.
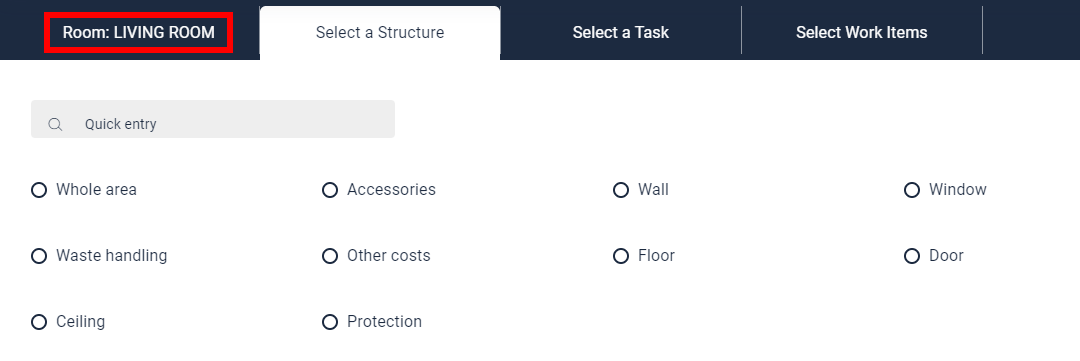
When room, structure and task is selected the wanted work items can be selected.
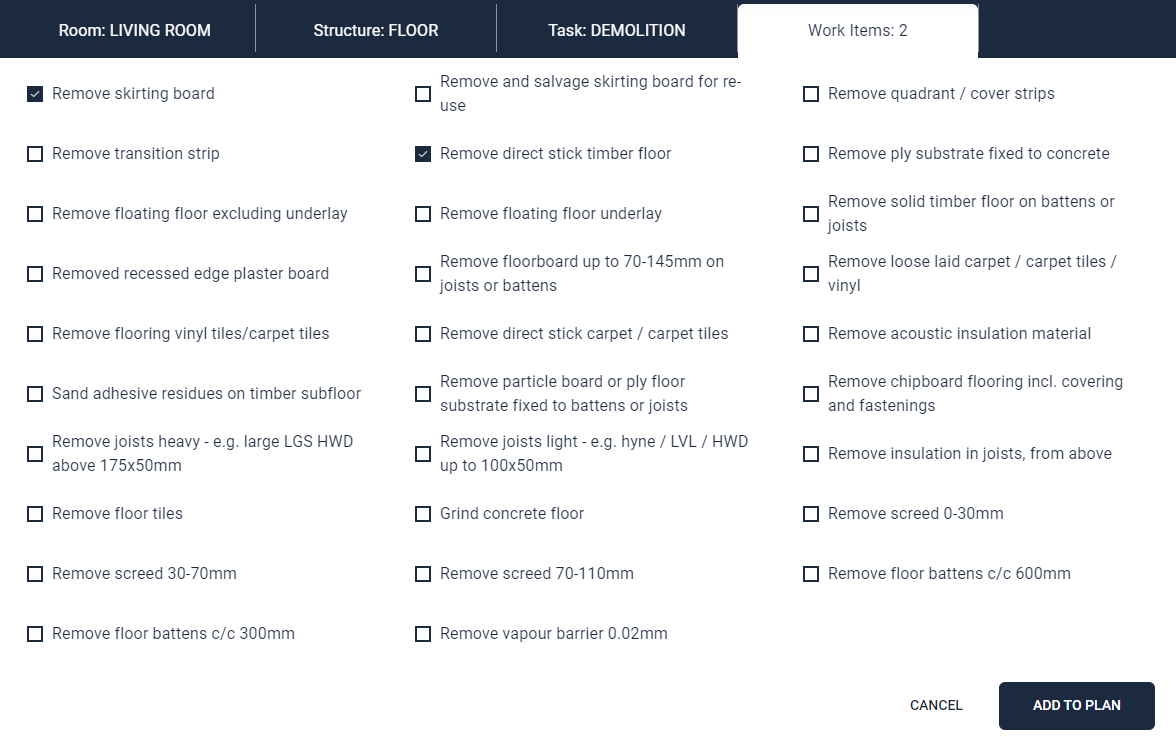
If there are related items available for the ones selected, they will be shown and can be selected right after the original items where added.
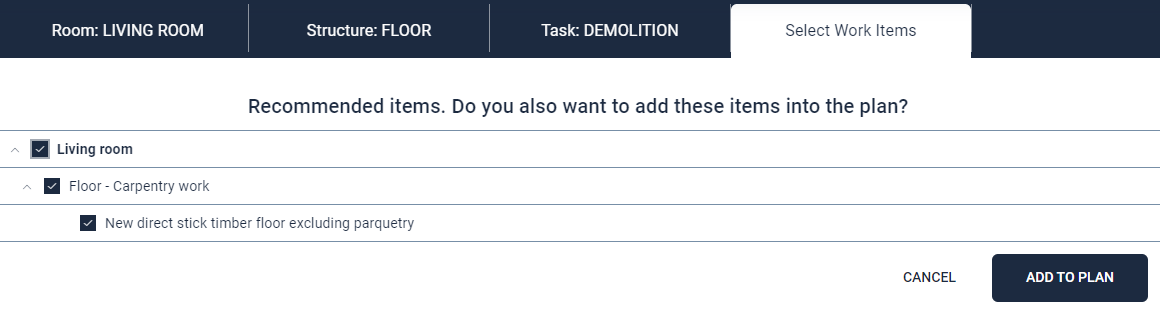
If you want to leave the selection view you can at any time, click Cancel to get back to the work plan.
Add items within a work plan
If more work items are needed in an already existing plan, they can easily be added by clicking the + buttons on the right level.

Depending on the level the correct values for room, structure and task will be automatically selected to make it quicker and easier to add the needed ones.

The selection of items as well as recommended items is working in the same way as already described.
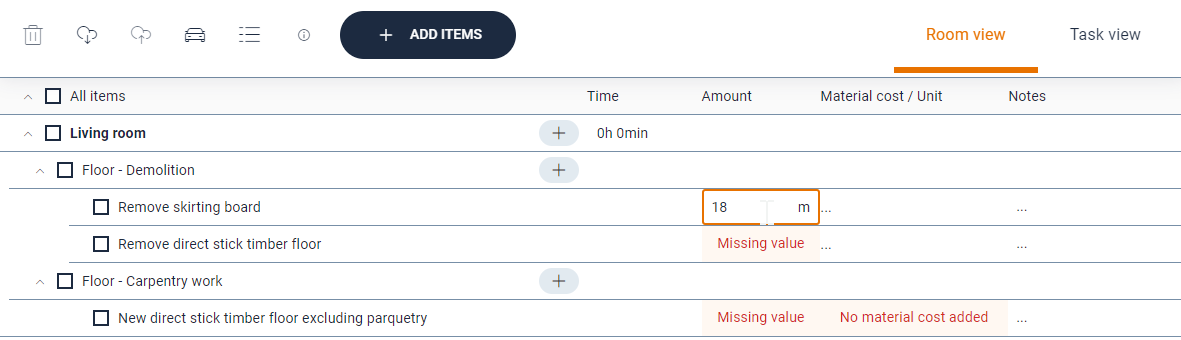
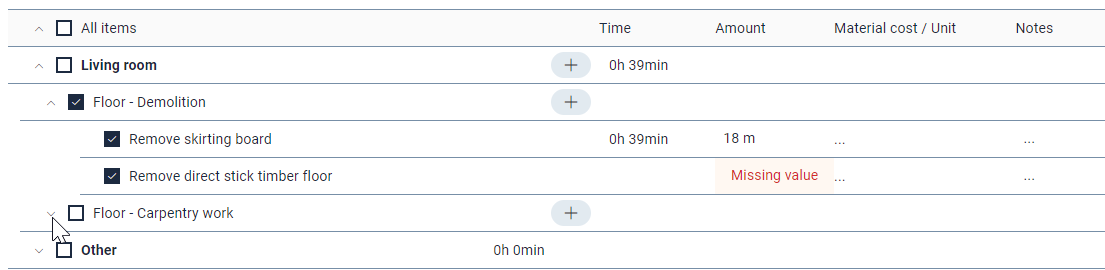
Add amounts, materials and notes
When work items have been added, you must add an amount for them, as well as materials where relevant. The items that need this information are clearly marked in the plan with red text when the information is missing. It is also possible to add notes by clicking on the three dots under the Notes column.
Delete work items
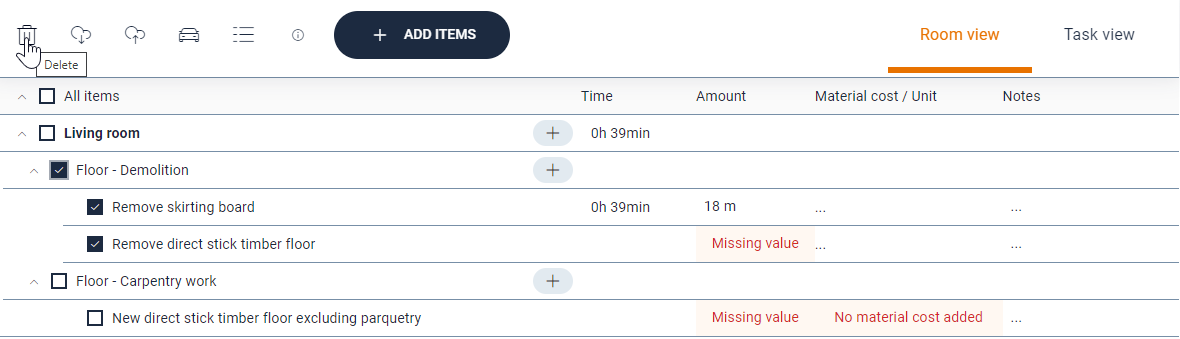
If work items are added by mistake or they need to be deleted by other reasons it is easy to select the items and delete several at the same time.
Select the items by clicking the boxes in front of them, or in front of the structure, task or room if that is the case, and then click the delete button. A confirmation dialog will be shown to make sure no mistakes are made.
Expand and collapse the workplan
It is possible to expand and collapse the work plan based on the different levels in the plan. This means that bigger plans are easier to navigate and work in.
Simply click the arrow button to expand and collapse the section you want.
Mark initial workplan as ready
When the first version of the workplan is ready and the insurance company or other users should take actions, it should be marked as ready.
To mark the plan as ready just click the icon in the top bar.

Creating a work plan from a tablet
It is possible to create a work plan from the Task Reporter app on a tablet. Note that the work plan functionality is only available on tablets, not on phones. Creating a work plan from the app is possible in inspection tasks and project management. This is done the same way for both task types.
To access the work plan, open an inspection or project management task, then press Fill work plan.
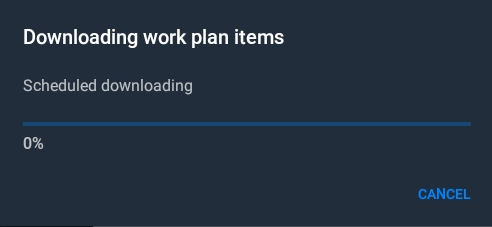
When you open the work plan, there may be a small window popping up saying that it’s downloading work plan items. This is done to synchronise the work plan with what’s on the server, meaning that if work items have been added from the web portal or from another tablet, then this will be synchronised so that these items appear in the work plan on your tablet. You can also trigger this synchronisation manually at any time from the work plan by pressing the  icon on the top bar.

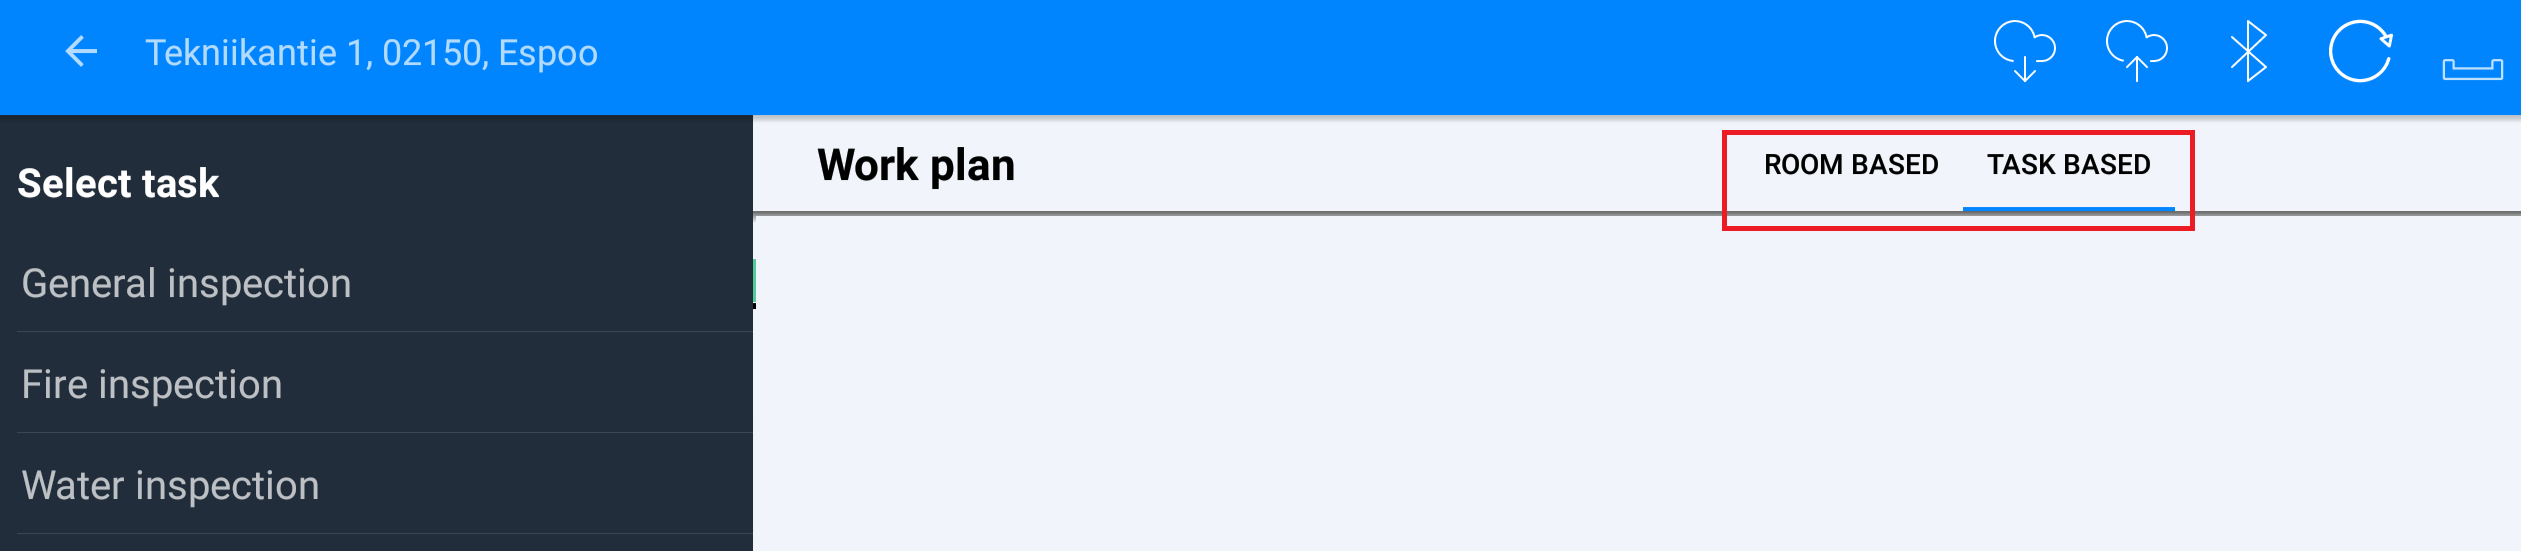
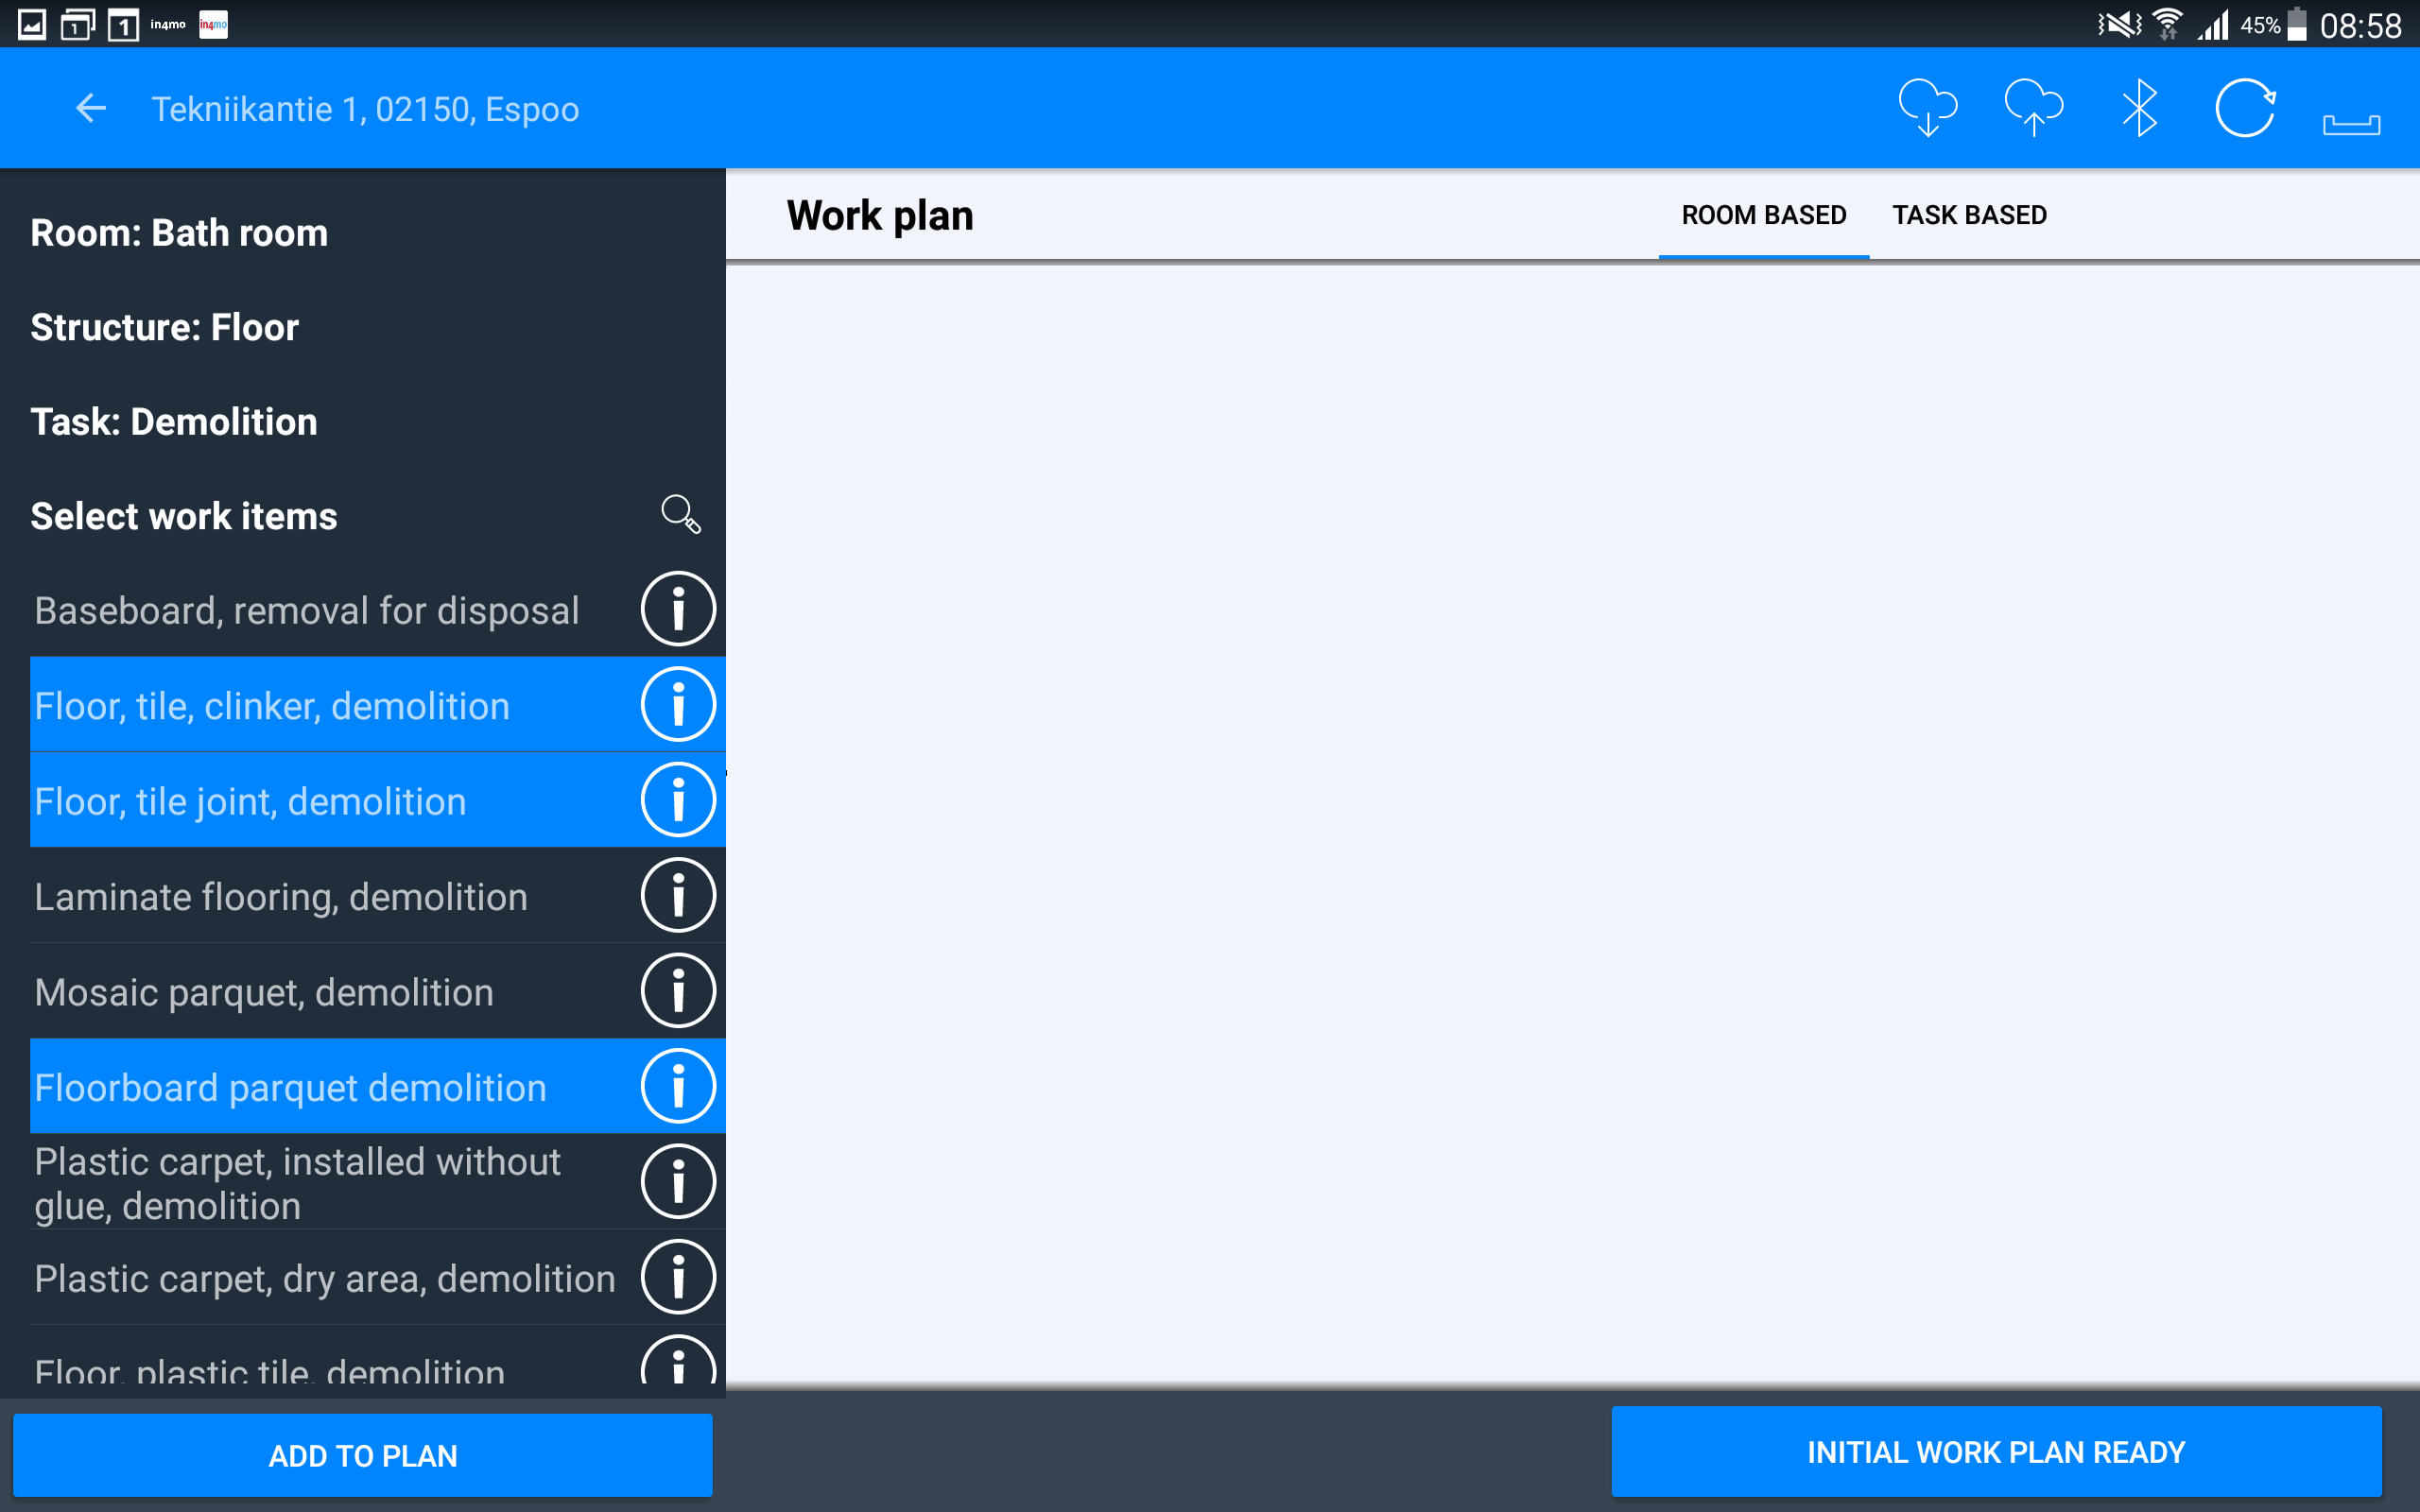
There are two structures which the work plan can follow; Room based, or Task based. By default, the system will show the work plan following a room-based structure, however it is possible to change this at any point inside a work plan by pressing the switch on the top right side. It is also possible to change the default structure in the app settings. Whatever structure you use does not affect what work items are available, they merely affect how you get to the work items.
The structure you choose determines how the list on the left side is structured. If following a room-based structure, the list on the left will show the name of different rooms, e.g. kitchen. When you press a room, you will next have to choose a structure, e.g. wall or floor. Choose one of the options, and you will see a list of the different tasks that exist in in4mo, e.g. demolition and carpentry work. Choose a task, and you will see all work items for this task and structure.

If following a task-based structure, you will first choose a task, e.g. demolition or carpentry work. When you have selected a task, you will next have to select a room, followed by structure, and then you will see the work items for this task and structure.
 It is possible to search for work items by pressing the magnifying glass.
The search function is accessible after you have selected which room there should be searched under.
Once you have entered some text in the search field, you will get results based on the search. You can then choose to add some or all of the work items that appear in the result from the search.
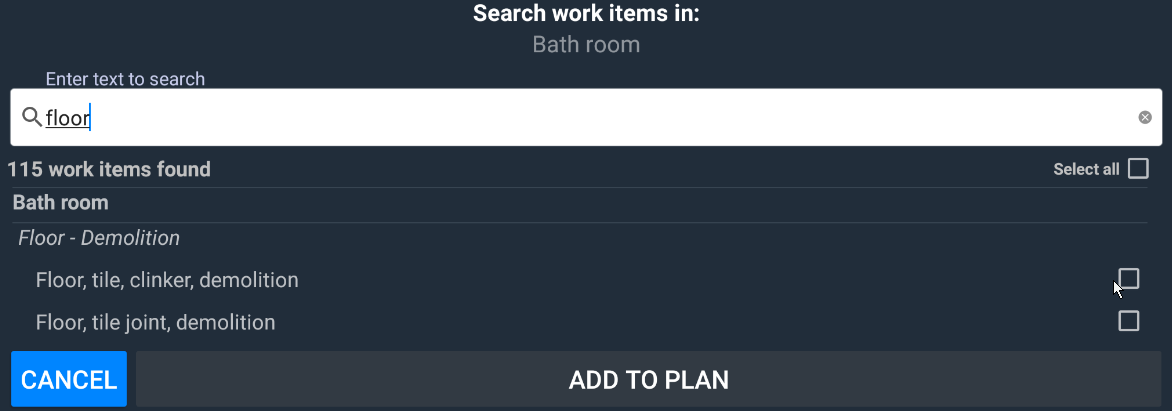
To add work items, mark the work items you want to add to the plan, then press ADD TO PLAN at the bottom of the screen. The items selected will then be added to the work plan, seen on the right side of the screen.
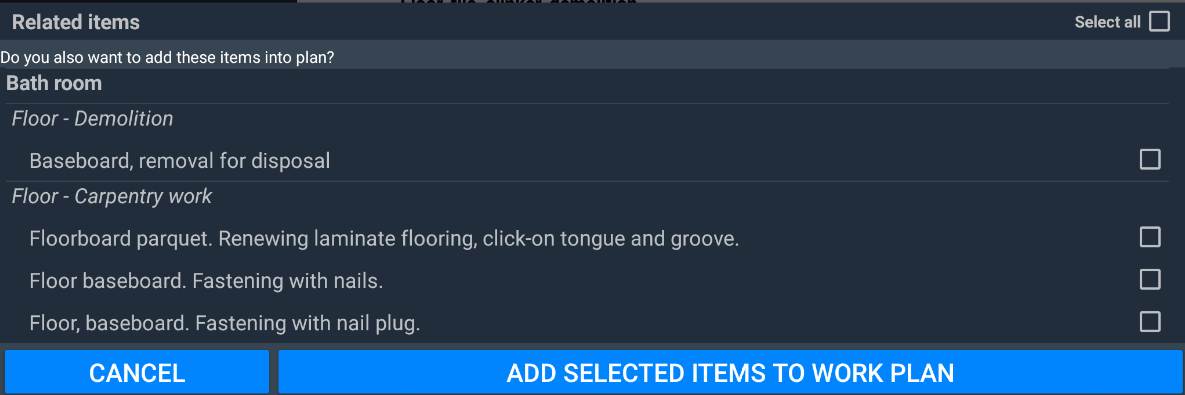
Many work items have a relation to other work items (e.g. if you demolish something, it might be that you will rebuild what was demolished). For such work items, when you add them to the work plan, you are asked if you wish to add related work items. You may then choose to add the related item (or items) or to just add the work item(s) you selected from the work item list to begin with. Related work items you choose to add will be added to the work plan in the same way as other work items.

To add amounts and/or materials to a work item, or to make changes to a work item which already has an amount added, simply press the work item. In the window that opens, you can write the amount manually, or you can use measurements from the floorplan if you have created a floorplan using in4mo FloorPlanner during the inspection.
For work items that include a possibility of there being materials involved, you can also select materials and prices here. You can choose between material from a supplier (provided that suppliers are integrated into the portal), standard materials from the in4mo system, or free text.
When you’re done, press SAVE to the bottom right, and you’ll be back to the work plan, where the amount and/or material has been added. Note that the amount may have been added also to other related work items using the same measurement. The same amounts are automatically being inserted for other work items that have the same unit type (e.g. m) and are in the same room and structure (for example the floor in the bathroom).

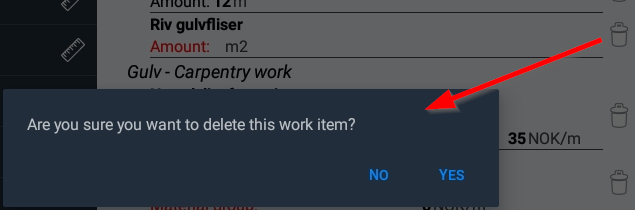
If you wish to remove a work item, this is done by pressing the rubbish bin to the right of the item you want to remove. A pop-up asking for confirmation will appear. Press YES to delete the item.
When you are done with the work plan, you can press INITIAL WORK PLAN READY, which will mark the work plan as being ready from your side. This is done to tell the insurance company that the calculation is ready, and that they can proceed with the case. It is still possible to edit a work plan after it is marked as above.

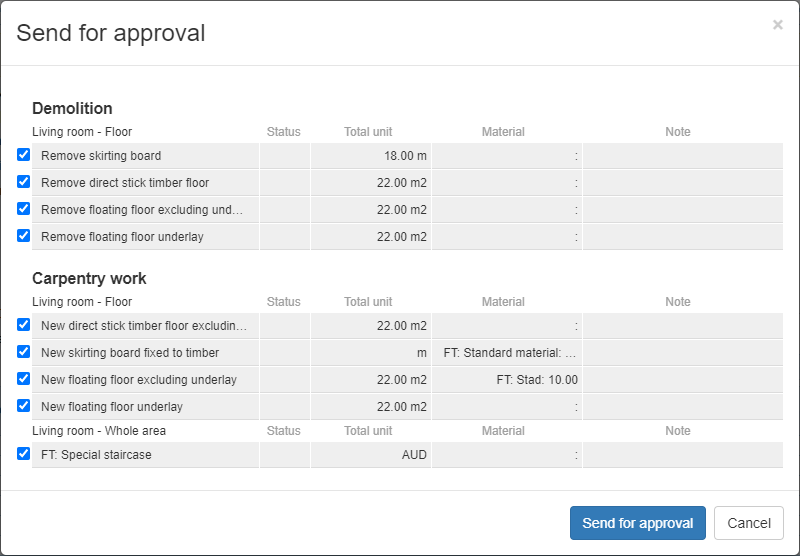
Sending the workplan for approval
When you are ready with your work plan and wish to send it for approval, this is done under the tab ‘Cost control’. Under the Cost control page you can see the work plan, and underneath the plan you find the button ‘Send for budget approval’.
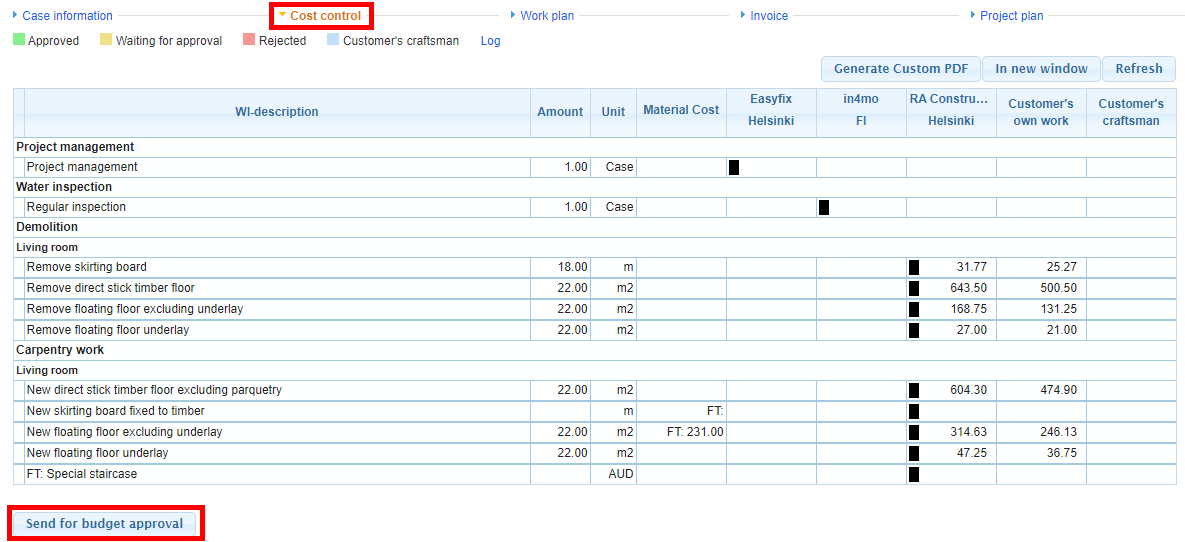
Select the items you wish to send for approval, then click “Send for approval’. The posts have now been sent for approval, and are awaiting approval from whoever is responsible for approving the budget in the case.